Welcoming Island Guide
Welcome to my guide for the Welcoming Island. The Island is designed to be a "tutorial" to teach new players the basics of the game. While the Island is easier than ever before thanks to the addition of informative signposts, it can still be a little confusing as the signs dont explain everything there is to know. So, I have written this guide to help people escape from the island, get to the mainland, and start their life in Egypt proper.There are two main goals you will need to complete to leave the Welcoming Island. The first is to become an Egyptian Citizen, and the second is to build a Ferry and sail it to the Egyptian Mainland. Both goals can be broken down into multiple tasks, many of which are inter-related, meaning that by completing a task for one goal, you also partially complete the other goal.
Aquiring Citizenship is a relatively simple process. You will see a "Citizenship" tab in the lower left corner of your screen. Clicking it will display the tasks you need to comeplete. As most of them are pretty self-explanitory, they will not be covered in this guide. The guide will focus on the construction of your Ferry.
The Basics
When you begin, you will find yourself on the summet of a large mountain, standing next to a Welcome Banner. Now would be a good time to get used to the game interface. To rotate the camera around your Avatar, move your mouse pointer to either side of the screen. To adjust the camera zoom, move your mouse pointer to the top or bottom of the screen. You can also use the mouse wheel to adjust zoom, if you have one. You can also change the camera view using the F5 to F8 keys. My personal choice is F6, the general camera, but find one that suits you best.You may want to play around with some of the general game options now, especially if your computer is low on specs. To do so, click yourself, then "Utility". A sub-menu will appear. Everything on the lower half of this menu has "Options" in front of it. Use these catagories to set things up the way you want them. Some of the options wont be clear at first, but will have more meaning later on.
Next, you may want to customise your Avatar to make him/her more unique. Click your mouse on your Avatar, and a menu will appear with various options. Click Appearance, and you will get a sub-menu filled with various options for changing the look of your Avatar. You may want to click on the small icon in the top right of the menu to "pin" it... or in other words, stop it from closing as soon as you click something else. Spend a bit of time exploring the options. With a little effort, you can make your Avatar very uniqie.
Now you are ready to make a move. To do so, simply click a spot on the ground that you would like to move to. Your Avatar will run there. Thats all there is to moving around. Something worth noting is that you will be able to run faster on roads than you can off-road. While this isn't a big issue when travelling short distances, it can make a big difference if you are moving a long way.
Finally, if you like the idea of a helping hand without giving everything away, you should follow the path down the mountain and read all the signs you come across. The signs are the "scarecrows" with green banners hanging from their arms. They will explain the basic controls, but will not go into the specifics like this guide. To be honest, I would reccommend trying things that way first. As I mentioned before, the Island is a "tutorial", so working things out yourself will help you understand the game better.
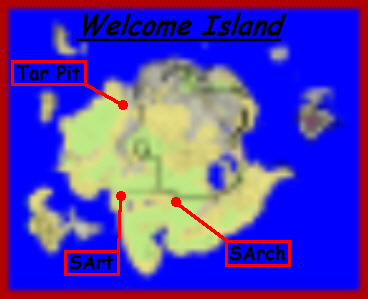
Island Location Map
Building a Ferry
Building a Ferry is a complex process, and requires various resources. Many of those resources need to be produced using various items of equipment, which in turn require skills to be learnt from Schools before you can build them. Here is the process step-by-step.The first thing you should do is learn to build two of the most basic resource producing structures, the Wood Plane and the Brick Rack. As you make your way along the path, you should see trees dotted around. Run up to a tree and click on it. You will get the option to harvest some Wood. Each tree you harvest will provide you with between 1-5 Wood. You will be needing 4 Wood. Next you will need some Slate. It is found on the banks of bodies of water. Simply walk along the bank until you see an Orange icon appear in the top right of your screen, depicting a hammer and chisel. Click this item to pick up 1 Slate. You will be needing 2 Slate, so walk further along the bank until the icon reappears.
Now you have the resources required to learn 2 new skills. Head to the School of Architecture (SArch). It is the first building you come to when travelling along the road... see the map for the exact location. Click on the School, and then "Learn". A new menu will appear showing all the skills it is possible to learn from this School. Click on "Stone Blade Fabrication". You will now get a box telling you what the tuition fee is. It should say that the skill costs 2 Slate. You have this in your Inventory, so click the button to pay the fee. You will get a confirmation box telling you that you have learnt the skill, and it will appear in your "Skills" tab in the lower left of your screen. Now learn "Brick Rack Construction" in the same way, which costs 4 Wood.
Now you must collect some more Slate. Collect as many as you can, because you will be needing a fair amount while you are on the Island. When you have at least 2 Slate, click yourself, then "Special". You should see an option to make a Stone Blade. Click it. Note that the skill is level based, so you may fail on your first attempt. If you do, simply gather more Slate and try again until you succeed. You will be needing 2 Stone Blades. When you succeed in making a blade, there is a chance that your skill will improve. When you reach the maximum level of 7, you will never fail to make a blade. When you have your 2 Stone Blades, return to the School of Architecture. On the "Learn" menu, click on "Carpentry". The fee for this skill is 1 Stone Blade.
You now have the skills required to build your first basic equipment items. First you need to find somewhere to make your camp. This should be a good distance away from other players camps, and away from the Schools. Click yourself, and then "Projects". This sub-menu will contain all the equipment you have learnt to build. At the moment you should have three options, a Wood Plane, a Brick Rack and a Chest. The Wood Plane is what you will be building first. Make sure you are standing a good distance away from the School, and click the Wood Plane button. You will see a window informing you of the resources required to build it... 1 Stone Blade and 4 Slate. Go and collect the required resources. If you have them already, clicking the button will make a "template" appear near your position. A small box containing arrows will also appear in the top left of your screen. Use the arrows to position and rotate the Wood Plane to where you want it, and then click the "Build" button. When you do, the Wood Plane is built and ready for use immediately. Well done... you have your first piece of equipment!
Now you will need some Brick Racks. However, these require Boards which you do not have. Go and find some trees, and harvest Wood. I would suggest collecting at least 44 Wood. Return to your camp and click on the Wood Plane. You will see an option to "Plane wood into boards". Clicking it will use 1 Wood, and produce 1 Board. Plane all 44 Wood into Boards. While doing this, you may find that the blade on your Wood Plane breaks. If it does, you will need to make a new blade using 2 Slate, and use it to fix the Wood Plane. When you have used all your Wood, open your "Projects" menu and click on "Brick Rack". Place it in the same way you placed the Wood Plane. Build at least 5 of these, as you will be needing a fair amount of Bricks while on the island. Finally, open your "Projects" menu again, and click on "Chests". As before, position it where you want it and click "Build". You now have a place to store resources, instead of carrying them around with you. Simply click the Chest, and you will see various menu options allowing you to stash, take and view items.
It is now time to learn some new skills. Head to the School of Art (SArt)... again, see the map for its location. Click on the School and then click "Supplies". You will be given the option to ask for some Flax Seeds, and you will receive 3 Old Egypt Seeds. You will need to grow these seeds into flax plants, and harvest the flax to aquire the next two skills.
Move to an open area of grass. Click yourself, then "Plant", then the seed type. A brown mound of earth will appear at your feet, with you standing in the middle of it. Now you have a choice of what to do, as there are two ways of growing flax. One way results in the plant producing more seeds, and the other produces Flax. As you only have 3 seeds, I would suggest growing some more first. Simply plant all 3 of your seeds, and watch the beds. After a few seconds, you will see yellow flowers growing. Leave the plants as they are, and do not click them. Around 10-15 seconds after the flowers have appeared, click the plant and you will see two options. One is to harvest seeds, the other is to rip out the bed by its roots. Click to harvest the seeds on all 3 flax plants. Now leave the beds alone for around 1 minute, and click them again. There will be more seeds for you to harvest. Each plant will produce 5-6 seeds before it dies, meaning you should get at least 15 seeds. That is enough to start growing for Flax.
This time, plant 5 seeds in a row relatively close together. Watch the plants carefully. As soon as the yellow flowers appear, click the plant and click the button to weed it. The yellow flowers will disappear. In a few seconds, they will appear again, so click the plant and weed it a second time. Around 10 seconds after you have weeded the beds again, click on the plant. You should now have the option to harvest the flax. Doing so will make the plant disappear, and you will get 1 Flax per plant in your Inventory. Keep growing plants and harvesting Flax until you have 20. Remember to grow more seeds as needed. For a simple method of continuous Flax production, see my Growing Flax Guide.
When you have your 20 Flax, head back to the School of Art. Open it's "Learn" menu, and click "Flax Processing". The fee is 10 Flax. As soon as you have the skill, head to a body of water, or the coastline. Stand near the water, click yourself, then "Special", Then "Rot flax in water". You will see a box asking you for an amount, so just click the "Max" button. You will hear a little splashing sound, and the Flax will be removed from your Inventory. If you look around, you should find an Orange bundle in the water with a Red flag. When the flag turns white, click the bundle and collect the Rotten Flax. Note that the rotting process does take a few minutes, so you may want to go and grow some more Flax while you are waiting. Once you have 10 Rotten Flax, return to the School of Art, open its "Learn" menu, and learn "Clothwork".
You now have the skills required to build three more pieces of equipment, a Flax Comb, a Small Distaff and a Student's Loom. However, you will need more than Wood and Boards to build them... you will need Bricks, Thorns and Twine.
The first thing you should build is a Flax Comb, found in your "Projects" menu under "Flax Related". You will need 36 Bricks, 18 Boards and 60 Thorns to do this.
As you have probably guessed, Bricks are made on a Brick Rack. You will need Sand, Straw and Mud to do so. Sand is easy to find. You simply stand on sandy ground and click the Yellow icon that appears in the top right of your screen. You will get a box asking how much you wish to pick up. Mud is also easy. Go to the bank of a body of water, and a Green icon will appear in the top right of your screen. Again, you can choose how much to pick up. Straw is slightly different. When you are standing on a grassy area, you will see a Blue icon in the top right of your screen. When you click it, you will collect 1 Grass. You then have to move a few paces away until the icon reappears, and click it again. Once you have enough grass, click yourself and then click "Drop". Choose to drop some Grass. After a minute or two, the Grass will change colour to sandy brown, meaning it has dried into Straw. Note that dropping Grass in smaller bundles will make it dry faster. You will need 1 Sand, 2 Straw and 3 Mud to make one batch of Bricks on a Brick Rack. Each batch yields 6 Bricks.
Thorns are gathered in a similar way to Wood, but from a different plant. If you look around near trees, you can often find small plants with spikey leaves. Clicking on one will give you the option to harvest Thorns. The amount you harvest from each plant is random, and yields of 10 to 90 or more have been reported.
When you have all the resources you need, use your "Projects" menu to build a Flax Comb in the same way as the other items you have built. You now have the means of producing Lint, Tow and Straw from Rotten Flax. If you grew some extra Flax while waiting for your Flax to rot earlier, put it in the water to rot now. If not, you will have to grow some more.
While waiting for the Flax to rot, you should build the next item, a Small Distaff. This is also found in your "Projects" menu under "Flax Related". You will need 100 Bricks, 12 Boards and 10 Wood to do so. However, I would strongly reccommend building two of them. You will see why shortly. A Small Distaff is built in the usual way.
By now your Flax should have rotted, so go and collect it. Bring it back to your camp and click on the Flax Comb. You will see the option "Seperate Rotten Flax (Step 1, Remove Straw)". Click that option, and 10 Rotten Flax will be deducted from your Inventory. Clicking the Flax Comb again will reveal another option, this time to remove Tow. However, you will not be able to do this just yet. When you clicked the button for step 1, you may have noticed a small box appear in the top right of your screen saying "END". This is an Endurance timer. Basically, it means you have done something tiring that has drained your Endurance, and you must rest a while before performing the action again. In the case of a Flax Comb, you must wait around 1 minute. The "END" box will disappear when you are ready to work some more. There are three steps to processing Rotten Flax. Once done, click the "Take" button to retrieve the resources produced. Each batch of 10 Rotten Flax will produce 10 Straw, 10 Tow and 10 Lint.
Now click one of your Distaffs. In the menu you will see options to load the Distaff with Lint, Tow or Twine. Load one with Lint and the other with Tow. Once loaded, a new option appears. If the Distaff is loaded with Lint, it will be an option to spin the Lint into Thread. If it is loaded with Tow, it will be an option to spin Tow into Twine. Start both the Distaffs. The process will take a while, so you may want to do something else while you wait such as growing/rotting more Flax. For every 1 Tow you will get 3 Twine. For every 1 Lint you will get 15 Thread.
Once you have made 120 Twine, you are ready to build a Student's Loom. As well as the Twine you will need 8 Boards. It can be found in the "Flax Related" sub-menu under "Projects". The Loom is capable of producing 3 different products, Canvas, Linen and a Sail. Each piece of Canvas requires 60 Twine. The Linen and Sail both require 400 Thread. Using the Loom to produce an item also uses an Endurance timer, like the Flax Comb. A rather annoying part of operating a Student's Loom is that a number of strings will break every time you use it. These will need to be replaced by using Twine before the Loom can be used again. However, you do not need to use your Loom just yet.
What you do need is the Ferry Construction skill from the School of Art. The tuition fee is 4 Tar, which can be collected by simply clicking on the Tar Pit found on the North side of the Island... see the map for its exact location. While you are at the pit, collect and extra 4 Tar, so that you have a total of 8 Tar. Head to the school of Art, pay the fee and learn the skill. You should be given a free Sail in addition to the skill itself. Then head back to your camp.
There have been reports of some people not getting the free Sail when learning the Ferry Construction skill. If this is the case, you will need to make one on a Student's Loom, using 400 Thread. If you already have a piece of Linen in your Inventory, you can use the Loom to turn it into a Sail. Be sure the Linen is in your Inventory... the option to make it into a Sail will not appear if it is on the Loom itself.
At last, you are almost done. All that remains is to produce the resources required to build your Ferry. You will need 20 Boards, 20 Wood, 4 Tar, 4 Rope and 1 Sail. How do you get Rope? Simple. Once you have made Twine in a Distaff, simply leave it in there and click the option to make Rope from Twine. For every 1 Rope you will need 5 Twine.
Once you have the resources you need, make your way to the nearest coastline. Stand as close to the water as you can, and go to your "Projects" menu. Under the "Misc" sub-menu you will find the option to build a Ferry. As with the other equipment, you can move it around and place it exactly where you want it. When you're happy, click the "Build" button.
Voila... you have your Ferry!
So, What Now...?
Now that you have built your Ferry, you should check your Citizenship tab in the lower left of your screen. Make sure you have completed everything on the list. If not, go back and do it now as you cannot leave the island until you have. You then have a choice of what to do next.Your first option is to stay on the Island a little longer. If you go to the School of Architecture again, you will see a skill called "Large Project Management". While the skill is not needed to leave the Island, it is a useful skill to have. If you choose, you can learn it when you get to the Mainland. However, you may want to learn it while still on the Island, as the School is nearby and you have already built everyting you need to produce the tuition fee. It costs 6 Rope and 2 Canvas.
Your second option is to leave the island without learning the above skill. To do so, simply click on your Ferry. You will then see a menu displaying all the various locations you can travel to on the mainland. Some of these will be default locations within the various Egyption regions, others will be the Welcome Banners of various guilds. It is entirely up to you as to where you go, but dont worry about picking the "best place". There really is no best location, as everything depends on what you choose to do when you get to the Mainland. On top of that, for your first 24hrs on the Mainland, you may teleport to different locations or to people you know up to 20 times. This allows you to quickly explore Egypt and find a place to call home. You may have already agreed to join a guild before leaving the island, maybe you have been offered the services of an experienced Mentor, or maybe you want to set up camp alone for a while. The choice is yours.
Your life in Egypt has just begun. Have fun!