Blacksmithing
Please add any theories you may have about how the new anvils work here.
Any information on what quality items are needed, and how to change the quality of a project are especially welcome.
Based upon irc chat: try using a hammer! (Hammers can be made in a Student's Casting Box)
If you can't see the quality readout, try turning on 'chat appears over player heads' in your settings.
Blacksmithing Items
Anvil Base - 8 iron and 8 wax, made in SCB, 3 minutes cool time
Ball Peen Hammer - 1 iron and 1 wax, made in SCB, 5 minutes cool time
Round Hammer - 2 iron and 2 wax, made in SCB, 5 minutes cool time
chisel - 2 tungsten and 2 wax, made in SCB
mallet - 2 lead and 2 wax, made in SCB (mislabeled as 1 lead 1 wax)
carpentry blade - 1 iron, made on the Anvil
hatchet - 3 iron and 1 wood, made on the Anvil
shovel - 2 iron and 4 wood, made on the Anvil
The anvil building must be built in a compound and costs 1 Anvil Bed, 120 firebricks and 4 water in jugs to build.
Blacksmithing Process
- Start with round hammer, ball peen hammer, and iron in your inventory
- Select a project on the anvil, either carpentry blade, hatchet, or shovel. I would suggest that beginners start with the carpentry shop blade. It is by far the easiest to make.
- Select Goal Display Tool to see the ideal blade shape you are trying for
- Select a tool (hammer) to use, and a force. The round hammer makes wider, shallower dents than the ball peen hammer. The shaping mallet makes even larger dents than the round hammer, and moves the metal farther. Use higher force for large changes, lower force for detail work.
- Click on a spot on the raw blade on top of the anvil to strike that spot with the selected hammer and force. This will change the shape of the blade.
- You need to get to at least 3000 quality to have a usable blade.
- Keep trying, it can take hours to make a high quality blade.
- If your blade gets hopelessly messed up, don't worry. You can scrap the project and you will get your iron back.
Results
"What is the result of the shovel quality ???" -Caedric
We have got quality of 1976 for Iron Blades and 1932 for shovel blades so far.
"I have made both an 8635 and a 9201 shovel." -grimunderpants
Regularly make: 9.5k carpentry blades (max: 9850) (time: 3min) 9.1k hatchets (max: 9437) (time: 10-35min) 9.2k shovels (max: 9556) (time: 20-40min). -Leetah
- Quality 3114 hatchet gives double wood and double time, just like a T1 axe.
- Quality 4045 hatchet gave a variable bonus of 2x or 3x, seemingly at random.
- Quality 5500 hatchet gives 3x wood regen time on wood is also 3x.
- Quality 5765 hatchet gives 3x wood regen time on wood is also 3x. [by Ithaqua]
- Quality 7000 hatchet gave a variable bonus of 3x or 4x, seemingly at random.
- Quality 7424 hatchet gave a variable bonus of 3x or 4x, seemingly at random.
- Quality 7517 hatchet gave a variable bonus of 3x or 4x, seemingly at random.
- Quality 8300 hatchet gives 4x wood regen time on wood is also 4x.
- Quality 8703 hatchet gives 4x wood about 90% of the time (57 times out of 63) and 3x the rest (Tamutnefret).
- Quality 9005 hatchet gives 4x wood regen time on wood is also 4x.
- Quality 9301-9482 hatchet gives 4x (sometimes 5x) wood regen time on wood is also 4x (sometimes 5x).
- Quality 9603 hatchet gives 4x (5x, 16 out of 59 times: ~25% 5x) (Ife)
- Quality 5433 Blade gives 1144 boards [by Ithaqua]
- Quality 6790 Blade gives 1596 boards
- Quality 8405 Blade gives over 2k boards.
- Quality 8454 Blade gives 2141 boards
- Quality 9334 Blade gives 2445 boards
Estimated utility:
<number_of_boards> = ( <quality_of_blade> - 2000 ) / 3
<wood_yield_multiplier> ~= ( <quality_of_hatchet> / 3000 ) + 1
Rounded to higher or lower integer, with the fractional part of the calculated score giving the odds of rounding up.
Example: Calculated multiplier 3.2 means a hatchet that gets 3x wood 80% of the time and 4x wood 20% of the time.
Pics
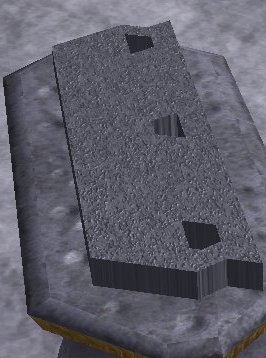
This is the anvil, with a starting block for a carpentry blade on it. The starting shapes are different depending on what you are trying to make.
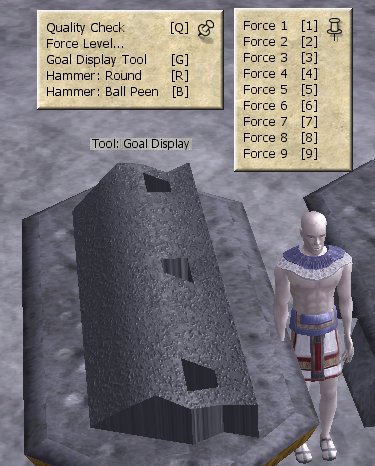
This is the goal. You can only affect the thickness of the slab, not its shape.
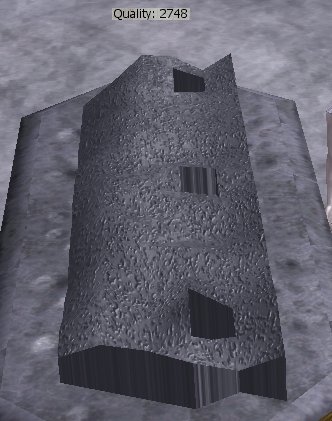
After a little hammering
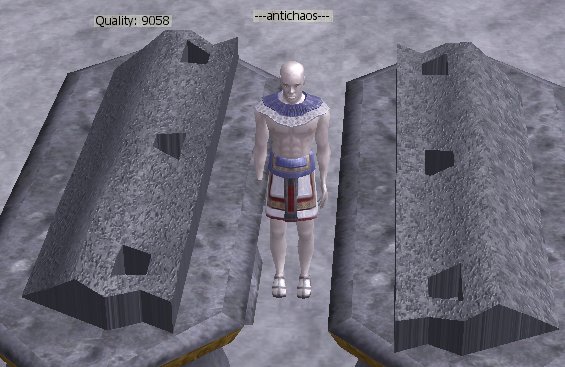
After some careful work, very high quality is possible.
The carpenty blade is very straightforwad to make. The hatchet and shovel are rather more difficult. Both require you to move a mass of metal, to which there is a trick that is rather counter-intuitive.
Sicantreis's take of forging
Think of it as clay, you can't add any clay, or take any clay away, just push it around. The more force you use, the larger the area around the point of contact to be effected. The point at which you strick (click) moves the most, and each area around it moves a little less.If you would like to move clay from one end to the other, hit it hard at the end you want to remove it from, there by creating a large hill of clay next to where you hit. Now hit that hill but a bit softer, some of the clay will move in the direction you wanted, some will return to the area you wanted to remove from. Now restrike the area you wish to remove from, and then agian the hill it creates and the hill it creates. Eventually you will end up with all the clay at one end if you repeat this enough.
This should help you get the hang of pushing the clay from one area to the next, to create the shapes you need. Also if you click on the show goal tool and a hammer repeatedly, you will see which areas of your item don't resemble the "goal item" if you look closely as it changes back and forth.
Sord's Observations
The node you strike will go down. Depending on the hammer and neighboring node height, some of the surrounding nodes may also go down. The total number of units the nodes dropped will be randomly added to the surrounding nodes. It is not directional, so trying to get material to move is a excercise in repetition until chance moves it in the desired direction. Using a stronger force will cause larger changes, increasing the odds that at least some material will move in the direction you want. I have not seen good evidence that larger forces affect more area, rather a larger force increases the odds that a nearby nodes might be affected.
grimunderpants' shovel tips
A guide would be quite hard but I have some tips for those who are having trouble making the shovel.
1. Getting the metal distribution just right is a toughie, there is a trick though.
But first a quick explanation of the hammers. It just so happens that the round hammer actually makes hexagon shaped dents (not so round is it?). The ball peen hammer hits on a point. So if you're familiar with 3d modeling, you're probably noticing ( thinking maybe? =D ) that the round hammer actually hits 7 points at once, a central point in the middle, and 6 points all connected to it and one of the other adjacent points. If you don't understand it yet, think of a regular(every side is the same) hexagon with 3 lines cutting across it, passing thru one point, the center point, and then the opposite point. This would make 6 equilateral triangles. For you non-math people, 3 points are required for a plane. Now we have a plane on top of the metal, and this is the 3d model aspect because 3d rendering engines often rely on polys, in which they create 3 points and then draw a surface on that plane. But anyway, if you were to assign (x,y,z) coordinates to each point, you would have a different (x,y) coordinate for each point, but on a fresh start, every (z) coordinate is the same. So in essence, when youre smacking away at that metal, you're actually just changing the (z) coordinate of each point. So now when you hit the metal with a round hammer, you distribute a certain number of z values away and lower the 7 points that you hit by a respective amount. Same holds true for the ball peen except you only affect one point at a time.
Anyway, if you didn't understand that then don't worry, I'll kill myself later. :)
If you look at the goal you should notice some hexagon shaped spots on it ( 1 close to the tip, 2 next to each other near the back ). The center of these spots, when hit with the round hammer ( remember, hexagon ), align perfectly with the shovel's goal. This makes getting those big areas right simple. Just don't pound too much, they're not flat.
The other nice part is that each one when hit just right will also help distribute the metal to the right spots on the shovel. I often start by just blasting a channel up the middle with a force 9 round hammer then even it out a little with a force 2 round just to get the valley type shape. Once you have that just get the 3 spots and slowly work it out.
2. Use hotkeys! If you don't know how to do this, goto your chat options and enable chat and skill window minimize. Some might fight the way the chat window works when minimized annoying but it's worth this trick.
Hotkeys make this stuff way way way easier.
B = Ball Peen Hammer
R = Round Hammer
Q = Quality Check (I use this the most)
G = Goal
1-9 = Force
Now the nice trick to do is just hit B and G alternating. This will cause the goal and the ball peen hammer ( essentially you're current status on the metal ) to appear. It's a lot easier to form the image what where to hit when you're seeing the differences between yours and the goal switching.
3. When doing step 2, aim for the spots that are higher than the goal's. It's so much easier to lower a spot on the metal a few notches than raise one. When you raise a spot, you have to hit an area next to it and hope the (z) value is distributed up there. Just aim for spots to hit down because all that needs is just a few taps from the ball peen hammer.
4. If you've gotten reasonably far but still can't get it up past 5 or 6k, start using only the force 1 ball peen hammer. The difference in force between force 1 and 2 is HUGE, compared to 2-9. Force one is so gentle and you might think it's too slow. STICK TO IT!! It takes me roughly an hour or so to get to that 9k shovel so don't think its not worth the time. Take your time and you will eventually get it.
5. Moving material seems hard but if you exploit ( maybe not the best word choice, sounds like I'm cheating ) the way the hammers work and the way the metal system works it's quite simple. Take the hatchet for example, massive amount of material that needs to be moved. To do so, just take ball hammer, force 9, and pound out the edge on the front. You should get a huge ridge formed just behind the edge. Now take a force 2 round hammer pound out behind the ridge. Now here's the exploitation ( maybe :P ), when you use the round hammer you're hitting 7 points, not just the point you clicked. Use it so that one of the outer edge points of the hammer hits the ridge, not the middle point. This will cause the material to not move back to the edge but just short of it, and more material will slide back on the blade. Then you just do that in waves moving the material slowly to the back.
(Ledara: This is the way you're supposed to do it, except i find I can get a more accurate basic angle on the hatchet by doing this in reverse....creating a trough with the ball peen hammer near the base of the hatchet then shoving the metal from the blade end into it, repeating getting closer to the edge until an angle is achieved...the closer the basic angle is to the goal angle, the higher quality you can get the hatchet after smoothing it with lower force strikes. Also, create the back of the hatchet first, then work on the blade.)
(JoshuaNighthawk: Using the way the hammer hits is definitly not an exploit. You're simple moulding the material as you would in real life.)
6. If you're still having trouble with the material movement for the sides of the shovel, make sure to move it along the sides of the shovel. Since the sides have half the directions that the metal can go, you increase the amount of metal you move along with each hit. If you hit a point in the center, you move the material in 6 directions. On the side though, you only move it in 3.
7. If you're STILL having trouble... shoot me cause I can't explain jack.
Feel free to correct me anywhere in this if I'm dead wrong. Message me in game if you have questions. Arawn inspired me to write this big piece of sheep dung. :)