Basic Citizenship Guide
ATITD is a game based on the economy and development of Egypt.- To put it succinctly, there is no violence whatsoever.
- I will repeat, NO VIOLENCE!
- Just because we give you a knife and a sharp stick, it doesn't mean that you can kill somebody.
- It does mean that you don't have to constantly guard your back.
Now that that's out of the way, I would like to say Welcome to ATITD!
Especially if you're new to A Tale in The Desert, reading through this information will clear up a lot of questions that you will have, and will make your first few days in Egypt more enjoyable.
Points of Interest on the Welcome Island
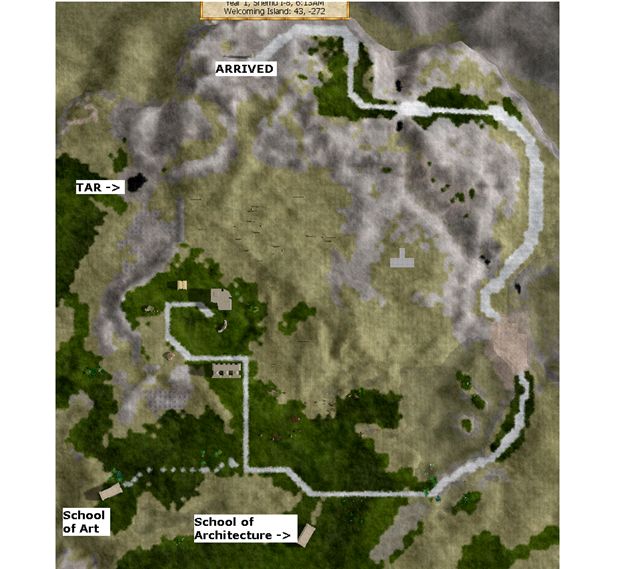
Start by opening the F3 map. This is a top-down view of your location and only the immediate surroundings. The small box at the bottom-right allows you to stretch the map and increase the distance of map view. The arrow in the middle shows which way the camera is facing, not your character. The black dots and labels are the schools. You should spend a minute and familiarize yourself with the island. Below is the welcome island with the ever-evasive tar pit located for you. The other, unnamed buildings are structures that have been erected by more advanced players. Take a look at them if you like, but you'll get plenty of exposure to those when you become a citizen.
Basic Movement
Your basic movement within the game is quite simple, Left click to move, Right click to stop.- Mostly you just click on your destination to go there but, if you set your utility options properly, you can also use the arrow keys to control movement. Note that the arrow keys only work if your chat box is minimized (press enter to toggle the chat box)
- To zoom the camera in/out, use the mouse wheel or use the mouse pointer to bump the bottom/top edge of the screen.
- To rotate the camera, use the mouse pointer to bump the left/right edge of the screen; the camera will swing in that direction.
Controls
To interact with an object or person, simply right or left click them to gain access to the interaction menus. You have to be fairly close to get the actual menu, or else you get the common too-far-away message.- You can also click yourself (or press ESC) to gain access to your own menu options.
- To gather some resources, such as slate, mud, or sand, click on the associated icons in the upper right corner of the screen.
- To gather other resources, such as wood, click on the objects that contain them, such as trees.
Personal Menu
When you click on your character, or press ESC, you pull up a large menu. This menu will continue to get more and more complex as your character gains skills and techs. Spend some time wandering through the menus and taking a look at all the options. When you learn new techs, it sometimes helps to go find it in your menu and familiarize yourself with where you will find it later, when you need it.Note: remember you can click on the top-right pushpin to 'stick' the menu and keep it from going away. This is essential for any repetitive task you will undertake on the same object.
Function Keys
The F keys can be used to shortcut certain actions within the game.- F3: Toggles the 1000x1000 coordinate thumbnail map.
- The local Schools and Universities are indicated.
- Your location bookmarks are indicated.
- Your waypoints are indicated.
- Clicking on the map will send the coordinates of that location to the main chat channel.
- F4: Toggles a north pointing arrow. The F8F8 view is also handy if you're disoriented (or if you're lagging.)
- F5: Selects the General Purpose Cam.
- F6: Selects the Explorer Cam.
- F7: Selects the Builders Cam, which is the best view for working your way through a mountain maze.
- F8: Selects the Dueling Cam.
- F8F8: Selects the Cartography Cam.
- F9: Activates the previous chat box.
- F10: Activates the next chat box.
- F11: Toggles the friends list that you've set up using /af <name>.
- Press F11 a second time to restrict the list to online friends only.
- Press F11 a third time to close it.
Helpful things to know (and type in your chat window)
- /clockloc - Displays Time and Coordinates on screen - very helpful!
- /time - Displays the current time (in game hours) in the Main chat window
- /ts - Displays Timestamps in chat, and gives you a feel for the pace of the conversation
- /chat <playername> - Starts a private chat with player
- /tell <playername> <message> - Whispers a message to player in their Main chat window
- /reply <message> - Saves you the bother of trying to spell weird avatar names
- /me - suppresses the ":" that normally follows your name in the chat list.
- /af <player name> : Adds a friend to your friends list
- /rf <player name> : Removes a friend from your friends list
- /me is routinely used to indicate sidebar comments, as opposed to conversation.
Help Banners
Click on the short "help screen" banners. They actually contain a lot of useful information.
Reaping and Gathering
Before I get into the Citizenship Test, I'd like to review some basic gathering info.- Slate: Orange Collection button. Appears sporadically along the water's edge.
- Mud: Green collection icon. Along the water's edge.
- Sand: Yellow collection icon. Along the water's edge and from desert areas.
- Wood: Gathered from trees.
- Thorns: Gathered from spiky plants.
- Tar: Gathered from a tar pit. The tar pit is located at coordinates 15, 234 (you can find coordinates by using the F3 map or by using /clockloc)
- Clay: Can't be gathered on the island, as you can't get the necessary jug of water.
- Grass: Blue collection icon. Gather from grassy areas.
- Straw: Made by drying grass and also by processing flax in a flax comb (1 per flax).
- Flax Seeds: Received from SArt or harvested from "wild" flax beds.
- Flax: Grown from flax seeds (You'll get either flax, or more seeds, depending on your growing technique.)
- Rotten Flax: Made by "rotting" flax in the water, using your skills menu.
- Tow: Made from processing rotten flax in a flax comb (1 per flax).
- Twine: Made from processing tow in a small distaff (3 per tow).
- Rope: Made from processing twine in a small distaff (5 twine).
- Sail: Received from the SArt, as part of your tuition.
You can make, but don't need, the following items:
- Lint: Made from processing flax in a flax comb (1 per flax).
- Thread: Made from processing lint in a small distaff (15 per lint).
- Canvas: Made from processing twine in a students loom (60 twine).
- Linen: Made from processing thread in a students loom (400 thread).
- Sail: You get one for free.
- /me grumbles about how easy life is for the younguns.
Important Note
You cannot bring anything you made from Welcome Island to Egypt. If you try to travel on your ferry with linen or bricks or other made items, you will get a message that you must leave them behind. Don't worry, there is plenty of good stuff in Egypt
Guide to passing Citizenship
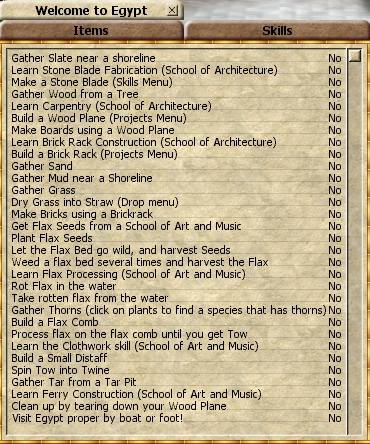
Open the "Welcome to Egypt" tab in the lower left hand corner of the screen.
Carpentry
The first thing to do on this list is "Gather Slate near a shoreline" to do this walk along the edge of a body of water till an orange icon with a chisel pops up in the top right hand corner of the window. Click the orange icon to "Gather Slate". You'll need a few dozen at least when all is said and done on this welcome island, so continue to gather them along your way, as convenient.The next thing on the list is "Learn Stone Blade Fabrication." This will require you to gather at least 7 slate and bring them to any SArch(check the map with F3). Click the school and select "Learn..." from the menu, select "Stone Blade Fabrication", and Click "Pay Tuition". This removes the slate from your items list. You now have your first skill. You may want to find it in your skills list, in your personal menu.
Let's make our first tool - the stone blade. If you have at least 2+ slate in your inventory, you can try to make one. If not, head back to the shore line and gather more slate.
- Click on yourself (or press ESC) to pull up the main menu.
- Select the skills menu.
- Select "Make a Stone Blade". You'll get a message telling you whether or not you succeeded.
If you were planning ahead, you could have made your stone blades right next to the SArch, in which case you have the tuition for Carving skill already. If so, learn it now before moving to the next step.
Following down the list, we are going to "Gather Wood from a Tree." Walk up to any tree, click on it, and select "Gather Wood." Take note at the number of wood is gathered, as it varies by tree. You'll start recognizing the good wood yielding trees (gives 4 or 5 wood) from the lame ones (only 1 wood).
Now head back to SArch and get the Carpentry skill from the Learn menu, if you haven't already. You should now have the wood, slate, and stone blades that you need to build a wood plane.
Clicking on yourself and select the Projects menu, then select "Build a Wood Plane", and make 8 boards. If you're standing near the SArch, it gives you a perimeter message, so go find a nice spot near the water and good trees for efficient production of materials.
Brick Making
Head back to SArch once more, get the Brick Rack Construction skill from the Learn menu. When you get back to your "camp", select "Build a Brick Rack" from your Projects menu. You now you have the basic tools that are needed to build many of the building and tools in the ATITD world. Head to the shore line and gather some mud and sand using the corresponding icons in the top right corner of the screen. You can gather as much mud and sand as you can carry (500 debens). You'll need 3 mud, 2 straw, and 1 sand for every brick that you want to make, so if you want to make the most possible bricks at a time, gather a 3 to 1 ratio of mud to sand, like 300 mud, 100 sand.Head back to your brick rack and pick grass on the way, as you're running along in a grassy area, by clicking the blue and green grass icon in the top right corner of the screen. When you get back to your brick rack drop the grass by clicking yourself and selecting the "Drop" menu, select grass and enter an amount(less grass in more bundles will dry faster), wait for the grass to turn yellow (Straw), and pick it up. Click your brick rack, select "Make Bricks", wait for the bricks to dry (they change color when they're dry), select "Take", and then select "Everything" from the brick rack menu. If you are waiting around for the bricks to dry, make more brick racks until you are working constantly to keep up. Remember your hotkeys for taking the newly dried bricks to save time.
Growing Flax
Head over to the SArt (check the map with F3), click the school and select "Supplies" now select "Request Flax Seeds". Nile Green is a trap; it needs to be watered but you can't make a jug. You want Old Egypt flax seeds. If you don't get Old Egypt flax seeds, just wait 3 minutes and try again.To grow flax, plant a bed of flax plants using the "Plant" menu, on grass. Flax will not grow on sand. After a short while, green flax shoots with blue flowers will appear in the bed. Shortly afterwards, yellow weeds will appear. Weed the flax bed by selecting the appropriate menu option. You'll need to weed the bed at least once. Eventually, the flax will finish growing and you may harvest it. There are no signs that the flax is ready for harvest except more flowers grow in the flax bed. The best way to tell is to click on the flax and see what the menu says.
- Flax grown in the above manner will not produce any seeds. To grow flax seeds, plant a bed of flax but do not weed it. Shortly after weeds appear in the bed, the flax will go to seed. You will see more of the yellow weeds. You may then harvest seeds from the flax up to 5 times before it finally dies. When the plant dies, it will leave more seeds on the ground. Take care to not use up all your flax seeds when growing flax; you should always keep at least a few in reserve to grow more seeds. If you do run out, you'll have go back to any SArt to get a few more seeds.
- Growing flax can be a lag-sensitive process. If you have difficulty with lots of lag, you may miss the weeding time, and jump directly to the seed harvesting. If this is the case, plant smaller sets of flax seeds, or plant them with time intervals in between to avoid an all-or-nothing crop.
- Tip on spacing: you can plant flax overlapping one another, but it is not recommended. You may get a very efficient use of space, but it becomes more difficult to see which beds have been weeded and which have not.
Rotting Flax
Most uses of flax require rotten flax, because ordinary flax can't be processed until it has been soaked in water to soften and separate the fibers. Regular flax may be rotted by standing near a body of water and selecting the "Rot flax in water" option from the "Skills" menu. Rotting flax in a body of water will create a flax buoy (which can be tricky to find if you're in a busy area) that you can retrieve once the flag turns white. The time required to rot flax, five minutes on the islands but 20 minutes on the mainland, is independent of the amount of flax in the buoy.
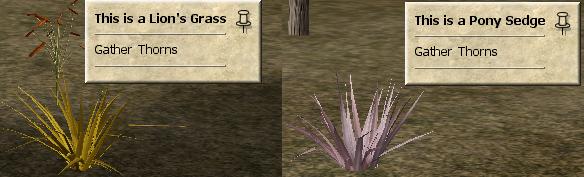
Gathering Thorns
Thorns can be tricky as only a few of the plants in Egypt produce thorns. Your best chance is to look for groups of trees with plants under them. Once you find a plant that gives thorns, click it and select "Gather Thorns." You will need 60 thorns. I have included two examples of plants the give thorns.
Flax Processing
By now your flax should be fully rotted, You'll need 20 Rotten Flax for tuition, plus that much again to finish the citizenship test. Head over to SArt with your Rotten Flax and get the "Clothwork" skill from the Learn menu. Now build a Flax Comb (60 Thorns, 18 Boards and 36 Bricks) and a Small Distaff (12 Boards, 100 Bricks and 10 Wood) using your projects menu. Process the rotten flax till step 2 and take the Tow from the flax comb. Load the tow into the Small distaff and start spinning it into twine, and then rope.
Build your Ferry
You need 20 wood, 20 boards, 4 tar, 4 rope, and 1 sail (that you will get as part of your ferry tuition).- You can gather tar from a tar pit. Look around the island; the pit looks like a small black lake. Ask someone for help if you need it.
- You can turn wood into boards using a wood plane.
- To make 4 rope, first rot 7 flax. Then process the rotten flax in a flax comb to get 7 straw, 7 lint, and 7 tow. Make the 7 tow into 21 twine in a small distaff. Turn 20 of the twine into 4 rope in a small distaff.
- Go to the outer edge of the island. Build your ferry by clicking on your avatar, then projects, misc, ferry boat.
- Don't sail to the mainland just yet. You're not quite done.
Finishing the Citizenship Test
Now that you have learned all the basic skills it takes to live like an Egyptian, it's time to clean up your area.- Start by picking up your brick racks (if they haven't already crumbled) and tearing down your wood planes.
- Please retrieve any extra Rotten Flax that you didn't need.
- It's also polite to tear down any other buildings you might have made (Small distaffs and any chests you have built) so as to keep Egypt clean.
One of the realities of Life in Egypt is that everybody wants to build their own stuff.
Clean up after yourself.
- Everything on your "Welcome to Egypt" tab should now say DONE.
- Now you can go back to your ferry and take a ride to the mainland of Egypt. Once there you can start exploring Egypt and can start your initiations into the 7 disciplines that are available.
When you select to ride to the mainland, you are given a large array of locations from which to start. There is no wrong answer, they are simply different locations throughout all of Egypt. I would recommend taking a short break, and checking back here at the Regions in the atlas for your intended starting location, and/or desired communities to join. By the way, the numbers given are the X coordinate(horizontal), and Y coordinate (vertical). Karnak is the largest research center, but everyone has their favorite city from which to start.
Mentoring
You should consider hooking up with a Mentoring guild for your first few weeks in Egypt. Mentoring guilds specialize in the support of newer members, and the conversations will usually make more sense. There's no need to listen in on the finer points of Festivals, when you can't even make Beer.You can also ask questions in Regional Chat (Island Chat is one such channel), and you'll find that Egyptians are generally quite helpful, so long as you're not hassling people or begging for something that you can easily accomplish on your own.