- Sand (either regular sand or white sand)
- An alkali (either soda or potash)
- Lime
The specific mix of ingredients will produce either soda glass, normal glass, or jewel glass.
Chemically speaking, glass is composed mainly of silica, which comes from ordinary sand. However, because silica melts at an extremely high temperature, soda or potash is added to lower the melting point to a workable level. This unfortunately also renders the glass weak and water-soluble, so a third ingredient -- lime -- is included to restore durability.
Guide to Glassmaking
Glass is produced in the Glazier's Bench.Glass is a product of sand, lime, soda, and potash.
Lime is produced in a firepit or crematory using limestone.
Potash is produced in a kettle using ash.
Ash can be produced in a firepit or crematory using leeks, dried flax, or dried papyrus.
Soda Glass
Soda glass products are produced with a combination of 10 sand, 1 lime, and 2 soda.Items that can be produced using soda glass:
- Glass Rod Takes 60 Seconds
- Glass Blade Takes 120 Seconds
- Glass Pipe Takes 90 Seconds
Normal Glass
Normal glass products are produced with a combination of 10 sand, 1 lime, and 2 potash.Items that can be produced using normal glass:
- Glass Rod Takes 60 Seconds
- Glass Pipe Takes 90 Seconds
- Glass Jar Takes 90 Seconds
- Sheet Glass Takes 120 Seconds (Success also depends on the Sheet Glass Fabrication skill)
- Glass Torch Takes 180 Seconds (Requires 5 glass)
- Empty Wine Bottles Takes 90 Seconds (Makes 12 for 1 glass)
Fine Glass
Fine glass products are produced with white sand instead of normal sand.Thus, fine glass products are produced with a combination of 10 white sand, 1 lime, and 2 potash.
Items that can be produced using fine glass:
- Fine Glass Pipe Takes 90 Seconds
- Fine Glass Rods Takes 90 Seconds
How the temperature of the bench works
Each glazier's bench works slightly differently. Specifically, the amounts that the temperature rises and falls by are different. It is always the same for a given bench. Adding 2 charcoal will cause the temperature to rise over the course of a few ticks, then hold steady until a total of 10 ticks have passed since adding the charcoal. At this point, the temperature will drop each tick until more charcoal is added (or it hits zero, of course). The total temperature rise tends to be between 40-70 (check these values?) degrees, and drops tend to be between 120-200 (check these values?) degrees.A little trick for getting your bench up and running with less charcoal is to add 2 charcoal, then add 2 more as soon as the temperature changes. Do this twice more (so 8 total charcoal used), then a couple of ticks later the temperature will jump up above 3200 degrees, which will allow you to melt your glass. For jeweled glass, you may need to add 10 total charcoal rather than 8 to get the temperature high enough.
For making glass, a good strategy is to add 2 charcoal each time the temperature drops, obviously. If you finish a piece of glass and the temperature is <1700 degrees, then don't start a new piece. Add 2 charcoal, then as soon as the temperature changes, add another 2 charcoal. The temperature will spike up much like it did when warming up, probably above 2400. Once the temperature is below 2400, you can continue your glassmaking from there.
A more advanced technique is a more controlled spike, adding the 2 cc when the temp drops, then another 2 after 60 seconds or so, spiking the temp from ~1700 to 2000-2300 depending on the properties of the bench. Multiple benches can be synched and run together by using the 6, 12 cc options to adjust the temperatures to be in the same range. Adding cc to all benches run at the same time makes working many benches much easier. Cappu is no wizard, but I could run 8 benches in T2 this way.
For more information about glazier benches than you ever wanted to know, see the T2 entry.
A Glazier's Bench

Melting Glass
- The temperature must be 3200 degrees or higher to melt soda glass and normal glass.
- The temperature must be 4400 degrees or higher to melt fine glass.
Guum's Easy-Glass Method for 6-8 Benches
Running benches the old fashioned way, I found 3 to be fairly easy, 4 to be a bit tricky, and 5 to be seriously headache-inducing. Others are much better at this, I know, but I wanted a way to work a bunch of benches at once without having to keep track of which direction the heat was going on each bench and when I had added cc to each. So here's what I came up with...
First, a couple of caveats. Obviously, to run 6 or more benches, you have to have that many benches built (and loaded with the 19 gone-forever glass), so this is not a good method to mess with if you only need a bit of glass every now and then, nor is it a good way to start glassmaking. Start with a bench, then go to two, then three; then if that's not enough, give my method a try.
The second caveat is that this method is very charcoal inefficient. To make a single piece of sheetglass with this method, you will need approximately 11 (correction from before) charcoal, compared to 3-5 charcoal with standard bench-tending methods. Personally, I hate sitting in front of glazier's benches for any more time than is strictly necessary, so this extra charcoal is well-spent to cut my glassmaking time in half. Your mileage may vary.
Now on to the method...
The Set-Up
Pin the windows from all your benches across the top of the screen. If there is overlap, make sure that, no matter which windows are on top at any given moment, you can at least read the first two digits of the temperatures on all your benches. Get them up into normal glassworking range (1600-2400), and select your projects. Your screen should look something like this:
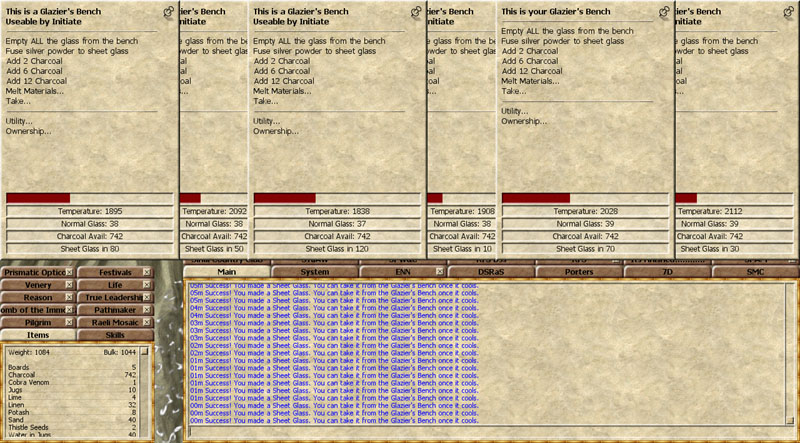
Don't worry about paying too much attention to whether the temperatures are going up or down -- unless you want to cheat a bit and try to save some charcoal, you don't have to concern yourself with that using this method. Just keep scanning the temperatures: what you're looking for is a temperature in the 1600-1799 range (i.e., starting with a "16" or "17"). Once a bench hits this range, you need to do two things: first, add 12 charcoal, and second, move the window down about an inch from the top of the screen.
You can see in this shot below that benches # 4 and 6 have wandered into this zone. I have added the 12 charcoal to each, and dragged them both down a bit:

Resume your scanning. You're now looking for two things. Just as before, if you find a bench in the 1600s or 1700s which is flush against the top of the screen, add 12 charcoal and move it down an inch. If you find a window which is in the down position, but has its temperature above 1799 degrees, move it back to the top of the screen. You can see here that bench #4 has gone above 1799 degrees, so I've moved it back to the top:

Other than starting other new projects when the previous ones conclude, no other action is required. There's no need to remember where you've added charcoal: the position of the windows does this for you. Make sure that you never add charcoal to a window in the down position, and make sure that you remember to move the windows back up when the temperature rises above 1799 degrees.
I'd also suggest that, until you're comfortable with this method, you do not try to cheat and add charcoal except in the case given above. Running a lot of benches at once, it's easy to forget which ones you've added charcoal to recently -- if you are trying to cheat and your concentration slips and you forget that you just added 12 cc to bench #15 and moved it back up to the top, you could easily add another 2cc and lose your project. Remember that the point of this method is to sacrifice charcoal efficiency for bench-time efficiency and ease of operation: if you follow the instructions above, you should never lose a project, barring lag, etc.
Running More Than 8 Benches
The real limiter to how many benches you can run simultaneously using this method is screen real estate. The Hrair Limit makes it tough for most humans to keep track of more than 7 or 8 things at once, so remembering "states" is a real handicap for the traditional method, but this one only requires you to scan and click relatively quickly. If you wanted to run more than 7 or 8 benches, I'd recommend moving the lower shelf for adding 12 cc to 1899 (i.e., feed 12 cc & lower window if <1900 degrees, raise if >=1900 degrees), just to give yourself an extra tick to respond -- this shouldn't have much (if any) impact on the charcoal efficiency of the method, but it will allow for even higher scaling.