Demonstrate the Principle (Required Level 1)
Show 1000 Bricks and 1000 Boards at the University of Architecture
Principle demonstrated by: Archilochus (Lower Egypt) On: 27 May 2006
Initiation into Architecture
The Initiation Into Architecture principle is available to citizens of level 1 or higher. It requires that you build a compound which is then expanded to 16 sectors. You don't have to expand it yourself, in fact you can donate the compound to your guild and still pass the initiation if somebody else expands the compound. Successful completion of this Principle increases your level by 1.
Low Cost Housing
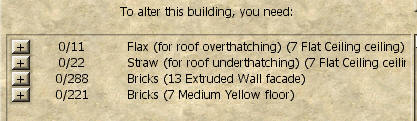
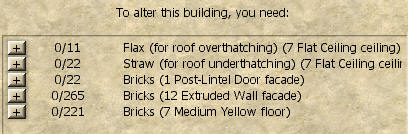
Once you've aquired Citizenship, your next likely task will be to build a Compound and complete Principles of Architecture. You'll need the following materials:- 11 Flax
- 22 Straw
- 908 Bricks
- 200 Boards
Step 1
Go to a convenient School of Architecture, use your F3 map to find a SArch, and purchase the Compound Construction skill. The cost is:- 200 Bricks
- 100 Boards
If you've already built a compound before you become an Initiate Into Architecture, the "Build a Compound" item won't show as "Done". Not to worry, the real requirement is the expansion of a compound, by whomever, that you originally built. When you click on the compound utility menu, and claim the buildout, the program will give you proper credit.
Step 2
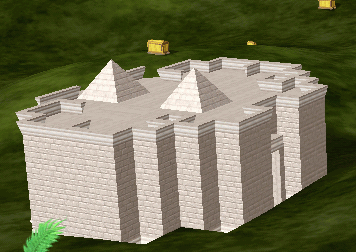
Decide where you would like to build your camp. If you are associated with a Guild, ask the elders for some good suggestions. You'll need some room to expand later on, so pick a spot that is 40 or more coordinates from the nearest compound. A handy way to judge distances to remember that there are 16 feet per coordinate, and avatars are also 16 feet tall, to scale. Use the /clockloc command or the F3 map to get the actual numbers for the coordinates.You can get a quick view of the compound floor plans at Initial Styles, and you can click on the links in the first column to see snapshots of the finished compounds.
We'll go into the details later, in Compound, but if you want a nice looking expanded compound that costs significantly less than any other approach, click on yourself (or use the ESC key) and select
Projects > Compounds > GemFacets.The cost for each of the compounds is:
- 200 Bricks
- 100 Boards
Step 3
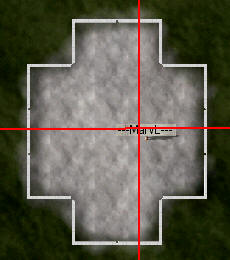
Press your F8 key twice to get a cartography view of your compound, directly overhead with north at the top of the screen. Lower the walls and move to the center of your compound.Click on your compound, pin the menu, and select Blueprints > Edit Blueprints. Move the popup so that it doesn't block your view. Someday, when you're rich and famous, you can indulge in Paint and Cut Stone Textures. For now:
- Select Wall Texture > Bricks
- Select Trim Texture > Stripes
- Change the free paint colors if you wish
Step 4
Click on the Building Shape tab > Add a sector. Here's the shape we're after.
If you're careful, you can add the sectors while you're in the Double F8 view. Add the following sectors:
- Two sectors on the top right, north side
- Two sectors on the bottom right, south side
- Three sectors on the right, east side
Step 5
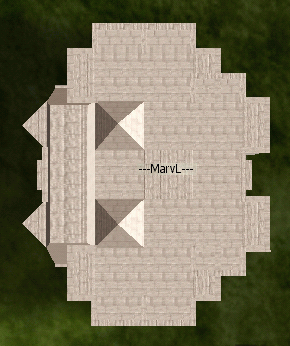
Now that we have the 16 sectors that we need, the GemFacets Compound had 9 sectors and we added 7 more, we need to finish the walls. Use the F6 view to take a close look at your compound and then come back to a Double F8 view to do the actual work.On your Blueprint Editor, click Basic > Post-Lintel Door and click on the center of the right, east wall to create a door.
On your Blueprint Editor > Basic menu again, select Extruded Wall and click each of the other 12 surfaces that we added in the previous step, two outside walls and two end walls on the north, east, and south sides.
At this point your blueprint should match the earlier picture.
Step 6
Click on the X to close the editor, click on the compound again > Blueprints (maybe you pinned the menu) and this time select "Load the Materials".
 | With extruded walls all around |
 | With one Post-Lintel door If you look in Compounds, you'll see that Post Lintel doors are supposed to cost the same as an extruded wall, and yet the model with the door is less expensive. Why? Because the brick requirements have their decimals truncated. |
Load the necessary items. Congratulations, you are now the proud owner of an expanded compound!
Click on the compound again > Blueprints (you still didn't pin the menu??), and Claim your Right to be an Initiate of Architecture.
Construction Budget
Here's a recap budget for the Initiation into Architecture.| Budget Item | Flax | Straw | Floor Bricks | Wall Bricks | Total Bricks | Boards |
| Compound Construction Tuition | 200 | 100 | ||||
| Build the Compound | 200 | 100 | ||||
| 13 Extruded Walls | 11 | 22 | 221 | 288 | 509 | |
| 12 Extruded Walls | 11 | 22 | 221 | 265+22=287 | 508 |
Related pages
- To see exactly which styles are available, and how to place them accurately, visit Initial Styles
- Compounds has a wealth of information about costs and compound optimiztions.
- Main Tests page
- Initiation into Architecture - level 1
- Test of Towers
- Test of the Obelisk
- (predicted:) Test of Funerary Temple
- Disciples of Architecture