This page provides the Tale 3 information that you'll need to design the compound of your dreams, rather than a resource eating nightmare.
- You may have already completed the Initiation into Architecture.
- To see exactly which styles are available, and how to place them accurately, visit Initial Styles
- Additional information is available at T3Beta/Compounds/Compound_Placement
What's a Compound?
A compound (or canopy sometimes) is your house or, perhaps the better description would be, your barn. It's where you'll be putting most of your stuff. The compound has a project menu. Click on the compound wall and you'll get a nice grid that lets you exactly place your new "building". You don't have to provide the materials immediately, although you can only have one project underway at a time. If you have breakable objects in your compounds, Kilns and Combs/Rakes in particular, you won't be able to rebuild them if you have some other project underway. You can abandon the other project and get all your stuff back, but that's a pain.If you want to rearrange the buildings in your compound, you can, but the recurring price for Eastern Meditation is just plain scary.
There are a couple of technical issues that seem pretty goofy until you understand the reason why they exist.
- You can gather grass and clay right through the floor of a compound. Some doofus can, therefore, make your camp ugly, but she can't block access to valuable resources.
- Outside buildings and compounds can overlap. They sort of don't know about each other, but it's not that simple.
- Objects that are covered by the compound, even though they are outside objects, are not rendered when the compound walls are up. You'll see a lot of compounds with Greenhouses, Camel Pens, and Sculptures that appear to be well outside of the compound once the walls are down. What happened was that the builder of the outside object very carefully positoned the outdoor object so that the anchor point was just barely inside of the compound.
Building the Compound
Building a compound, and getting it expanded to 16 sectors, is the first task faced by a new Citizen. You must first get the Compound Construction skill from the SArch for 100 Boards and 200 Bricks, and then build your compound for another 100 Boards and 200 Bricks. Take a look at the models on the Initial Styles page, and figure out exactly where you want to stand when you build your compound. You won't get a widget for moving or rotating your compound, because you can strip your compound down to a single sector and rebuild it, but that's an expensive solution.You'll be a lot happier if you just look at the huge red + sign in the pictures on the Initial Styles page, and stand right where the terrain coordinates cross. You can also come out to 1380 2310 in northern Seven Lakes, between the UThought and Caldera Park, and take a look at the row of Model Compounds. There's a chest in each compound that marks where the builder was standing, and there's also a public single sector compound at 1290 2310, near Caldera Park, that you can play with.
When you are looking at the Initial Styles, for example, don't pick Classical Columns just because it looks impressive. The marble for any future expansions will be very expensive.
Another gotcha is the Wall and Trim Texture. The fancy arches and the large building blocks both require Cut Stone. That's easier to get than Marble, but you might want to change the Walls to Bricks rather than Blocks and the Trim to Strips rather than Arches.
Initiation to Architecture
You can use the cookbook approach to get past your Initiation into Architecture, or you can take the time to really understand compounds, and create a unique compound.Real Architecture
Expanding a compound can get very complicated, especially so if you what it to look really nice and fit into the landscape. This discussion gets pretty technical, so just glance through it for right now. Come back and study it more carefully when you find out that the cost of an expansion you wanted to make is going to be thousands upon thousands of bricks and cut stone.You can't iteratively tune the cost of a compound. Once you click on the "Add Materials" menu to determine the cost, you can abandon the upgrade, look at the blueprint design, or Add the Materials for the upgrade. You can't go back and fix things, you have to start over. As such, it's a pretty good idea to get the basic shape of the compound the way you want it, using cheap extruded walls, on the first pass and then fancy it up on the second pass.
Distance Multiplier
The multipler for distance, measured from your cornerstone sector, is a brutal expotential function.Stated as an Excel formula, the multipler is Base*2^((Round(x^2+y^2),0)/3).
Where D=distance from your cornerstone sector,
Costs vary with 2^(D/3).
If you have a square compound with the cornerstone sector in the middle, the multipler for corners at a greater and greater distance hits you as follows:
| Size | Distance | Factor | Multiplier |
| 3x3 | 1,1 | 2^(1/3) | 1.26 |
| 5x5 | 2,2 | 2^(3/3) | 2.00 |
| 7x7 | 3,3 | 2^(4/3) | 2.52 |
| 9x9 | 4,4 | 3^(6/3) | 4.00 |
| 11x11 | 5,5 | 2^(7/3) | 5.04 |
The following data was developed by placing single sector additions, with the default configuration of 4 sloped walls, at various distances from a single sector base. You can't directly observe the costs of the initial compound, but you can back into the number. The hypothetical values for the base sector are therefore italicized.
| X | Y | Power | CFlax | CStraw | Bricks | Slate | FBricks |
| 0 | 0 | 1.00 | 1 | 2 | 80 | 16 | 20 |
| 0 | 1 | 1.26 | 1 | 3 | 100 | 20 | 25 |
| 1 | 1 | 1.26 | 1 | 3 | 100 | 20 | 25 |
| 0 | 2 | 1.59 | 2 | 3 | 126 | 25 | 32 |
| 2 | 2 | 2.00 | 2 | 4 | 160 | 32 | 40 |
| 0 | 3 | 2.00 | 2 | 4 | 160 | 32 | 40 |
| 3 | 3 | 2.52 | 3 | 5 | 201 | 40 | 50 |
| 0 | 4 | 2.52 | 3 | 5 | 201 | 40 | 50 |
| 0 | 5 | 3.17 | 3 | 6 | 254 | 51 | 63 |
| 4 | 4 | 4.00 | 4 | 8 | 320 | 64 | 80 |
| 0 | 6 | 4.00 | 4 | 8 | 320 | 64 | 80 |
| 5 | 5 | 5.04 | 5 | 10 | 402 | 80 | 101 |
| 0 | 7 | 5.04 | 5 | 10 | 402 | 80 | 101 |
| 6 | 6 | 6.35 | 6 | 13 | 507 | 101 | 127 |
| 0 | 8 | 6.35 | 6 | 13 | 507 | 101 | 127 |
| 0 | 9 | 8.00 | 8 | 16 | 640 | 128 | 160 |
| 7 | 7 | 10.08 | 10 | 20 | 806 | 161 | 201 |
| 0 | 10 | 10.08 | 10 | 20 | 806 | 161 | 201 |
| 8 | 8 | 12.70 | 13 | 25 | 1015 | 203 | 254 |
| 0 | 11 | 12.70 | 13 | 25 | 1015 | 203 | 254 |
| 0 | 12 | 16.00 | 16 | 32 | 1280 | 256 | 320 |
| 9 | 9 | 20.16 | 20 | 40 | 1612 | 322 | 403 |
| 0 | 13 | 20.16 | 20 | 40 | 1612 | 322 | 403 |
The theoretical model, rounded to the nearest integer, is within +/- 1 for all observed values.
| The location of your cornerstone sector and the layout of your compound is very, very important. Fortunately it's pretty easy to place your compound exactly where you want it. The center of the Cornerstone Sector will snap to the nearest terrain coordinates intersection. Teppy apparently wants smaller compounds, or perhaps he doesn't want to rewrite the entire rendering engine just to accomodate those who think compounds make great fences. At these prices, huge open fence-style compounds aren't practical, that's for sure. | 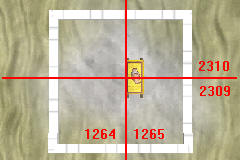 |
Cornerstones
You will be issued one cornerstone when you become a citizen, and another at the start of the next game season after your first paid month.When Teppy introduced the brutal BasicSectorCost*2^(D/3) size multiplier, he promised to "Do Something" to compensate for the consequent use of more, smaller compounds. As it turns out, the "something" was to shut off deterioration for compounds that had never had a cornerstone. Until mid-August that is, when compound decay was reactivated.
We'll provide more information as it becomes available. For the moment, keep your eye on your non-cornerstone compounds, and any vacated compounds that are blockng your view. We'll provide details as they become available.
If a compound gets to 0% protection, the stuff inside it will start rotting, and thus will not be usable.
Building on Slopes
 | When you click on a compound type in the menu, a compound of that type is built immediately. The cornerstone sector will end up wherever you are standing. None of the materials are recovered when you tear down a compound, your 200 Bricks and 100 Boards are gone. Again, there is no compound preview, no positioning widget, and you can't rotate the compound. Take a careful look at the Initial Styles floorplan snapshots if the location of your cornerstone sector is critical. When you initially build, a popup will warn you that xx of 49 sectors are available at your selected location, even when all 49 sectors are available. I've never seen anything less than xx=21, so I suspect that you're not allowed to build at all unless 21 of the sectors in the 7x7 area immediately surrounding the cornerstone sector are suitable for building. "Suitable for Building" is, of course, the tricky concept. It's all about elevations. All of the sectors in your chosen building must be "buildable", but you can build practically anywhere if you don't care exactly which compound you start with. |
- If you can see the very bottom edge of the fountation, you can't expand from that wall
- If you can't see at least half of the wall, you can't expand from that wall
| It doesn't really matter how steep the adjacent hillside is, you can practically bury the outside wall of a sector, what counts is the wall where the sector is connected to the rest of the compound. This compound expanded just fine, in both directions. There are tricks, of course. :-) If you're trying to get past a ridge, just build your blueprint out around the ridge. Once you've managed to get a sector where you want it in the blueprint view, following the contour lines, you can remove the intermediate sectors and keep on going. You might even be able to cut through the ridge from the back side. Your compound is about 32 feet high, with a 4 foot fountation. Your cornerstone sector will be buried 2 feet into the ground. You can then extend your compound to any location that you can reach following a contour line that's -2 feet or +8 feet in elevation relative to the cornerstone sector. In other words, all compounds have flat floors. You're permitted to "go around" obstructions, however, and discontinuous sectors are fine. In fact many of the most attractive compounds create archways by using Special Sloped Roof Element walls that can span an empty sector. | 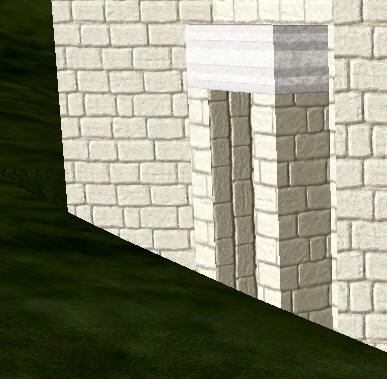 |
- You can't add a sector, no matter what, if the elevation of the ground at the connecting wall isn't somewhere in the lower half of the wall. The variance is about -2 feet or +8 feet from the elevation where you placed your cornerstone compound.
- The elevation of the outside wall doen't matter. You can practically bury an outside wall.
- Getting across a low spot is much more difficult than getting around a high spot.
- Disconnected sectors are perfectly legal.
- You can build a long ways from your cornerstone sector, if you're willing to pay the premium.
When you're picking a location, place your initial compound on the lower side of the area, but not at the lowest point in the area. Remember, getting around a high spot is easy. Just follow the contour line and then remove the intermediate sectors. Getting past a low spot is likely to be impossible.
Sticks and Stones
The cost of construction materials is the same (when the multiplier is 1) as it was in Tale 2 for the four sectors immediately adjacent to the Cornerstone Sector. In all other sectors you'll have to increase the material costs because of the Distance Factor.Pay particular attention to the last two columns. Oyster Shell Marble (OSM) is very expensive. Don't use columns unless you can afford the Marble, likewise for the fancy floors. Cut Stone is not quite as expensive, but it's sneaky because a few of the Initial Styles use Stone Walls and Arcs Trim, which both require Cut Stone. Otherwise, wedges are the only wall type that uses Cut Stone.
The costs of the base sector cannot be directly observed. If you want to obtain exact predictive values, you'll need to use the previously discussed multipler to back into the base numbers for your configuration. These numbers are the observed numbers for adding a single element to a 1 sector compound. The hypothetical initial values are about 80% of the lowest observable values.
| Material | Flax | Straw | Floor Bricks | Floor Marble | Wall Bricks | Boards | Slate | OSM | Cut Stone |
| Basic | |||||||||
| _ Plain Wall | 20 | ||||||||
| _ Plain Door | 24 | 12 | |||||||
| _ Post Lintel Door | 14 | ||||||||
| _ Extruded Wall | 14 | ||||||||
| Sloped | 20 | 4 | |||||||
| Stairstep | 24 | 4 | |||||||
| Sloped Special | 28 | 2 | |||||||
| Columns | 4 | ||||||||
| Wedges | 7 | ||||||||
| Plaster Floor | 20 | ||||||||
| Marble Floor | 1 | ||||||||
| Ceiling Type | 1.5 | 3 | |||||||
| Building Shape | |||||||||
| Paint/Texture | |||||||||
| _ Wall Texture | |||||||||
| __ Blocks | 10 for 4 Walls | ||||||||
| __ Bricks | 0 | ||||||||
| _ Trim Texture | |||||||||
| __ Arcs | 5 for 4 Walls | ||||||||
| __ Stripes | 0 |