Ce petit guide vous aidera ŕ construire l'atelier de vos ręves sans trop vous ruiner.
- Vous pourriez déjŕ avoir terminé l'Initiation d'Architecture.
- Pour voir les différentes sortes d'ateliers disponibles et comment les positionner judicieusement, consultez Types de bases
- D'autres infos sur la page Positionnement des ateliers
= Qu'est-ce qu'un atelier ?= L'atelier est l'équivalent d'une maison. Vous y entreposerez la plupart de vos affaires. L'atelier dispose de son propre menu "Projets", accessible en cliquant sur le bas des murs. Si vous lancez un nouveau projet, une grille s'affichera sur le sol vous permettant de le placer le plus précisément possible. Vous ne devrez pas fournir les matériaux de construction immédiatement, cependant vous ne pouvez lancer qu'un seul projet ŕ la fois. Si votre peigne ŕ lin se casse, vous ne pourrez le construire si vous avez un autre projet en cours. Vous pouvez abandonner ce projet et récupérer tout les matériaux que vous y avez mis, mais c'est un peu pénible ŕ faire.
Voici quelques anomalies ou problčmes liés aux ateliers :
- Vous pouvez récolter de l'herbe ou de l'argile ŕ travers le sol de l'atelier.
- Les bâtiments extérieurs et les ateliers peuvent se chevaucher... Ils ne se reconnaissent pas, mais ce n'est pas aussi simple.
Construire l'atelier
Construire un atelier et l'agrandir ŕ 16 secteurs est l'une des premičres tâches ŕ laquelle un nouveau citoyen doit faire face. Vous devez d'abord apprendre la compétence [Construction d'Ateliers]? auprčs d'une Ecole d'Architecture au prix de 100 planches et 200 briques, puis construire votre atelier avec également 100 Planche et 200 Brique. Jetez un oeil sur les modčles de la page Types de base et faites bien attention ŕ l'endroit oů vous vous tiendrez pour le construire.Vous n'aurez pas la possibilité de le bouger ou de le tourner, parce que vous pouvez réduire l'atelier ŕ un seul secteur et le ré-agrandir ensuite mais c'est une solution coűteuse. Vous serez bien plus heureux si vous regardez l'énorme signe '+' rouge sur les images de la page Types de base et que vous vous teniez ŕ l'endroit exact oů les coordonnées du terrain se croisent. Vous pouvez aussi vous rendre aux coordonnées : 1380 2310 dans la région des 7 Lacs, entre Uthought et le Parc Caldera et voir la rangée des modčles d'ateliers. Il y a un coffre dans chaque atelier qui indique l'endroit exact oů se tenait le constructeur et il existe aussi un atelier public d'un seul secteur ŕ 1290 2310, prčs du Parc Caldera.La deuxičme chose ŕ considérer ce sont les matériaux de construction. Vous obtenez un total de deux pierres d'angle, l'une quand vous payez votre premier mois d'abonnement, la deuxičme lorsque vous payez le deuxičme mois. Si vous installez une pierre d'angle dans votre atelier, en utilisant le menu options, il n'a pas besoin d'ętre entretenu. Mais sans pierre d'angle, l'entretien vous coűtera chaque mois environ 10 % du prix de base de l'atelier en matičres premičres, sans "pénalité de distance". Quand vous regardez les types de base ŕ la page Types de bases, par exemple, ne choisissez pas Colonnes Classiques ŕ moins de pouvoir utiliser une pierre d'angle, parce que ce type d'atelier demande beaucoup de marbre et que le marbre est "trčs" cher.
Un autre point ce sont les murs et leur aspect. Les jolies arches et la construction en blocs demandent des pierres taillées. C'est plus facile ŕ avoir que le marbre mais il vaut peut ętre mieux choisir les murs de briques plutôt qu'en blocs de pierre et les bandes plutôt que les arches.
Initiation ŕ l'Architecture
Vous pouvez utiliser cette approche rapide pour passer votre Initiation into Architecture ou bien vous pouvez prendre le temps de réellement comprendre la construction des atelier afin de créer un modčle unique.
Agrandir un atelier peut se révčler trčs compliqué, particuličrement si vous souhaitez qu'il soit vraiment beau et s'intčgre bien dans le paysage. La partie qui suit est assez technique et est destinée ŕ ceux qui souhaitent étudier les coűts d'agrandissement pour des ateliers nécessitant des milliers de briques ou de pierres taillées.
Distance Multiplier
- In Tale 2 there was size multipler of base cost time the number of old and new sectors in the compound. Nobody ever ran down the penalty because the costs weren't onerous.
- In T3Beta the size multiplier changed from the T2 sector count to a pure distance multiplier in coordinate from the cornerstone sector. The basic costs, however remained the same.
- In Tale 3 the size multiplier is even steeper. It's an ugly 3rd order polynomial. Also, the cost of a Post Lintel Door has increased from 14 to 22 bricks, and the cost of a Stairstep Wall has increased from 20 to 24 bricks plus the same 4 slate.
So far the multiplier appears to be 1/9 d^3 + 1/6 d^2 + 5d + 20 for the floor bricks, where d is SQRT(relativeX^2 + relativeY^2). This is pretty messy, so we're still looking for a more elegant pattern. - Quizzical & MarvL
The distance multipler can be tested by creating a one sector compound, there's a public one at 1290 2310, in Seven Lakes near the Model Compounds, Caldera Park, and the UThought. We used a phantom sector with a flat roof and four extruded walls, but you can actually ignore everything but the cost of floor bricks if you're only interested in the distance multiplier.
Start with the single sector compound with 4 extruded walls. Add 8 sectors in a line, for example, and then delete the intervening 7 sectors. Clean up (expensive) default walls on the phantom sector, don't forget the messed up wall on the base sector, and then use the blueprint to determine the cost of materials.
| Sector Distance | Floor Bricks |
| 1 | 20 |
| 2 | 32 |
| 3 | 40 |
| 4 | 50 |
| 5 | 63 |
| 6 | 80 |
| 7 | 101 |
| 8 | 141 |
| The location of your cornerstone sector and the layout of your compound is very, very important. Fortunately it's pretty easy to place your compound exactly where you want it. The center of the Cornerstone Sector will snap to the nearest terrain coordinates intersection. Teppy apparently wants smaller compounds, or perhaps he doesn't want to rewrite the entire rendering engine just to accomodate those who think compounds make great fences. At these prices, huge open fence-style compounds aren't practical, that's for sure. Unless a guild has several active members who are willing to contribute their cornerstones, compound maintenance is going to be a bi-monthly chore. | 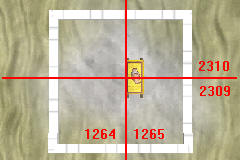 |
Building on Slopes
 | When you click on a compound type in the menu, a compound of that type is built immediately. The cornerstone sector will end up wherever you are standing. None of the materials are recovered when you tear down a compound, your 200 Bricks and 100 Boards are gone. Again, there is no compound preview, no positioning widget, and you can't rotate the compound. Take a careful look at the snapshots if the location of your cornerstone sector is critical. When you initially build, a popup will warn you that xx of 49 sectors are available at your selected location, even when all 49 sectors are available. I've never seen anything less than xx=21, so I suspect that you're not allowed to build at all unless 21 of the sectors in the 7x7 area immediately surrounding the cornerstone sector are suitable for building. "Suitable for Building" is, of course, the tricky concept. It's all about elevations. All of the sectors in your chosen building must be "buildable", but you can build practically anywhere if you don't care exactly which compound you start with. |
- If you can see the very bottom edge of the fountation, you can't expand from that wall
- If you can't see at least half of the wall, you can't expand from that wall
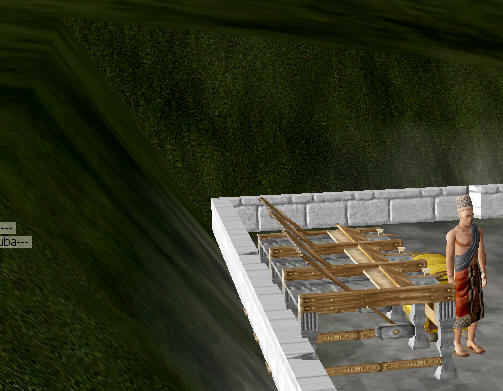
| It doesn't really matter how steep the adjacent hillside is, you can practically bury the outside wall of a sector, what counts is the wall where the sector is connected to the rest of the compound. This compound expanded just fine, in both directions. There are tricks, of course. :-) If you're trying to get past a ridge, just build your blueprint out around the ridge. Once you've managed to get a sector where you want it in the blueprint view, following the contour lines, you can remove the intermediate sectors and keep on going. You might even be able to cut through the ridge from the back side. Your compound is about 32 feet high, with a 4 foot fountation. Your cornerstone sector will be buried 2 feet into the ground. You can then extend your compound to any location that you can reach following a contour line that's -2 feet or + 8 feet in elevation relative to the cornerstone compound. You're permitted to "go around" objects, and discontinuous sectors are fine. In fact many of the most attractive compounds create archways by using Special Sloped Roof Element walls that can span an empty sector. | 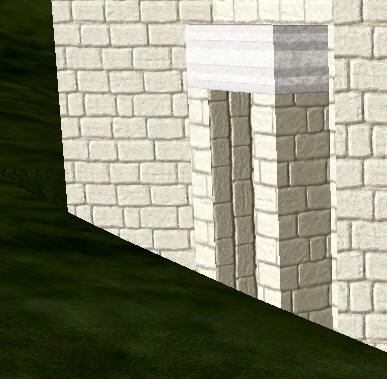 |
- You can't add a sector, no matter what, if the elevation of the ground at the connecting wall isn't somewhere in the middle of the foundation. The variance is about -2 feet or +8 feet from the elevation where you placed your cornerstone compound.
- The elevation of the outside wall doen't matter. You can practically bury an outside wall.
- Getting across a low spot is much more difficult than getting around a high spot.
- Disconnected sectors are perfectly legal.
- You can build a long ways from your cornerstone sector, if you're willing to pay the premium.
When you're picking a location, place your initial compound on the lower side of the area, but not at the lowest point in the area. Remember, getting around a high spot is easy. Just follow the contour line and then remove the intermediate sectors. Getting past a low spot is likely to be impossible.
Sticks and Stones
The cost of construction materials is the same (when the multiplier is 1) as it was in Tale 2 for the four sectors immediately adjacent to the Cornerstone Sector. In all other sectors you'll have to increase the material costs because of the Distance Factor.Pay particular attention to the last two columns. Oyster Shell Marble (OSM) is very expensive. Don't use columns unless you can afford the Marble, likewise for the fancy floors. Cut Stone is not quite as expensive, but it's sneaky because a few of the Initial Styles use Stone Walls and Arcs Trim, which both require Cut Stone. Otherwise, wedges are the only wall type that uses Cut Stone.
| Material | Flax | Straw | Floor Bricks | Floor Marble | Wall Bricks | Boards | Slate | OSM | Cut Stone |
| Basic | |||||||||
| _ Plain Wall | 20 | ||||||||
| _ Plain Door | 24 | 12 | |||||||
| _ Post Lintel Door | 22 | ||||||||
| _ Extruded Wall | 14 | ||||||||
| Sloped | 20 | 4 | |||||||
| Stairstep | 24 | 4 | |||||||
| Sloped Special | 28 | 2 | |||||||
| Columns | 4 | ||||||||
| Wedges | 7 | ||||||||
| Plaster Floor | 20 | ||||||||
| Marble Floor | 1 | ||||||||
| Ceiling Type | 1.5 | 3 | |||||||
| Building Shape | |||||||||
| Paint/Texture | |||||||||
| _ Wall Texture | |||||||||
| __ Blocks | 10 for 4 Walls | ||||||||
| __ Bricks | 0 | ||||||||
| _ Trim Texture | |||||||||
| __ Arcs | 5 for 4 Walls | ||||||||
| __ Stripes | 0 |
The research for Tale 3 Compounds was done, in large part, by MarvL, Quizzical, and Ur-man. There's a related Tale 2 page at Compounds.