Revision 2006L30 - School Lockboxes and Price List are all done
Welcome
 | Welcome to the Caldera Park Bijou School, which is sponsored by the Sunset Enterprises Guild. This is an instructional Venery for a complex skill, and it's likely that you will want to print a copy of the commentary. The source document is available at http://perl.atitd.wiki/wiki/tale3/Guilds/Sunset_Enterprises/Venery_-_Bijou_School. http://perl.atitd.wiki/wiki/tale3/Guides/Gem_Cutting is also a handy reference, with a more descriptive view. You have a full 10 days to complete the Venery. There's simply too much to accomplish for just one session. To get your first clue, please click again and select "Search for Keys." |
Unflawed Cuts
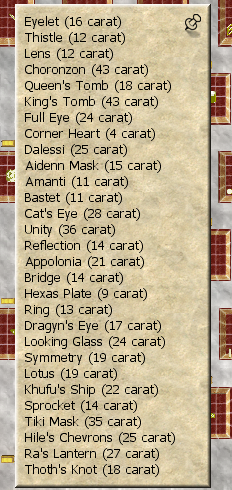
Corner_Heart_4, Amanti_11, Lens_12, Thistle_12, Sprocket_14, Symmetry_19, Looking_Glass_24, Dalessi_25, Hile's_Chevrons_25, Choronzon_43
Flawed Cuts
Hexas_Plate_F9, Bastet_F11, Ring_F13, Bridge_F14, Reflection_F14, Aidenn_Mask_F15, Eyelet_F16, Dragyn's_Eye_F17, Queen's_Tomb_F18, Thoth's_Knot_F18, Lotus_F19, Appolonia_F21, Full_Aidenn_Mask_F21, Khufu's_Ship_F22, Full_Eye_F24, Ra's_Lantern_F27, Cat's_Eye_F28, Tiki_Mask_F35, Unity_F36, King's_Tomb_F43,
Venery_Judging
Hint:We need to deal with a few preliminaries:
- Select ESC > Utility > Options > Video > and then Minimize Time of Day Lighting and Maximize Shadows
- Select ESC > Utility > Options > Chat Related > X in Inventory and Chat Tabs may be minimized.
- All of our school instructions assume that you are standing on the south side of the table, opposite the associated chest, looking southwest across the table toward the pole, using an F6 view.
- Imagine a clock on the Left Face = +X axis rotation = Roll Clockwise
- Imagine a clock on the Near Face = +Y axis rotation = Pitch Clockwise
- Imagine a clock on the Top Face = +Z axis rotation = Yaw Clockwise
- If the gem were an airplane, then we'd be looking at the front of the left wing. (If you're an engineer, aeronautics uses a mixed-hand rule for rotations.)
- Click on a tab, or press Enter, to minimize your chat window and enable HotKeys.
- Now click on any one of the nearby Bijou Tables that has a gem loaded, and look at the menu.
- Experiment with the HotKeys to control the rotations. Don't use the menu entries because you can't design effectively if you're constantly taking your eyes off of the gem. Rotating the gem has to be automatic.
- L = +X = Roll Clockwise about X, bank left
- O = -X = Roll Anticlockwise about X, bank right
- I = +Y = Pitch Clockwise about Y, nose up
- U = -Y = Pitch Anticlockwise about Y, nose down
- J = +Z = Yaw Clockwise about Z, turn right
- K = -Z = Yaw Anticlockwise about Z, turn left
- Don't do it yet, but you can also use HotKeys for the Sanding Discs
- S = Disc 1 = Sand Face (the face to your left, that you can't see very well)
- D = Disc 2 = Sand Edge (the top edge nearest to you)
- F = Disc 3 = Sand Corner (the right corner of the top edge)
Your first clue is attached to the local Watermine, and you might as well wind it on your way by, so you can collect some cuttable gems.
Clue:
Congratulations! We hope you enjoyed your tour of the Bijou School. Do please judge the Venery now, and hang around and visit with us if you have the time.
Watermine
Hint:You've missed a Lockbox. Use ESC > Tests > Venery > Keyring
Clue:
 | A Watermine will produce, on average, about one cuttable gem every half hour. The distribution and frequency seems to be random. If a Gem is loaded on the blue Gem Table, clicking on the Gem Catalog will yield a list of standard cuts, and their weights. The school tables (everything but the front row) are laid out in gem catalog order. The front row of Bijou tables has unique competition cuts for the Test of the Bijou. A few of the school tables are probably being used to get Bijou Principles, please judge them as Good rather than Fraud, but most of the school tables are Disqualified for Judging. We'll salvage any disqualified school table and allow you to rebuild it if you merely wish to pass your Bijou Principles. Each table has a Venery Lockbox on the associated chest, but only the school table chests have Venery keys that are required to complete the Venery. Each key is for the next stop, so you can always go to ESC > Tests > Venery > Keyring for where to go next. The Venery cuts are sequenced Easy > Hard. The sort order is Unflawed > Flawed, then Low Carat > High Carat. When you find the indicated chest, click on "Search for Keys" to consider the commentary and get the next key, and then stand on the south side of the table to try the cut. The first cut is Corner_Heart_4. |
Unflawed Cuts
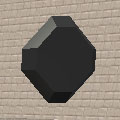
Corner_Heart_4
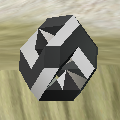
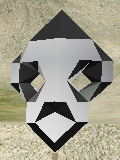
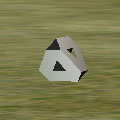 | The Corner Heart appears to be a flawed cut, but it's actually the smallest of the solid cuts. As the rendering program can't precisely place a point, it interpolates a little bitty triangle, that looks like a small flaw. The Corner Heart can be cut from any 2x2x2 solid using only F = Sand Corner. The shape you're after is called a quadrahedron, and it's the shape you get when you cup your hands together, with your knuckles as the two "ridges." |
- While it's possible to use just F = Sand Corner, let's first trim out a 2x2x2 cube.
- Rotate your screen a bit, not the gem but your screen, so that you can see a little bit of the left face of the gem.
- Use S = Sand Face until you get a flat surface.
- Use K = Yaw Anticlockwise to spin the gem to the next face, and repeat that until you have a tall 2x2 tube
- Use U = Pitch Anticlockwise to lay the gem on it's side.
- Use L = Roll Clockwise, FOUR TIMES, to see which sections of the tube are flawed, and therefore need to be trimmed out
- Use S = Sand Face to trim out the flawed section
- Use U = Pitch Anticlockwise, TWICE, to flip the gem
- Use S = Sand Face to trim off everything but a 2x2x2 cube
- Although we are using a 2x2x2 cube for visualization, it doesn't hurt a thing if the "proper" corners are already missing. In fact missing pieces are exactly why you would select one cut rather than another. In Gem Cutting you have to make the most of what you have.
- Use F = Sand Corner to take out the near top right corner
- Use K = Yaw Anticlockwise TWICE to present the non-adjacent top corner
- Use F = Sand Corner to take out the non-adjacent corner. The ridge is your knuckles.
- Use L = Roll Clockwise TWICE to flip the gem
- Use F = Sand Corner to take out this third corner
- Use K = Yaw Anticlockwise TWICE to present to opposite top corner
- Use F = Sand Corner to finish the cut
- Compare your cut to the challenge cut
- The comparison program is picky about orientation. Get it right.
- If your cut matches the challenge cut, you will get a "Success" message that says you can now judge the gem cut.
- If the School Table has not been disqualified from judging (we use them for Principles of Bijou) your next menu will include a "Judge" entry. Please rate the school cuts as "Good", as that's the minimum level for the Principles of Bijou, and also so that your judgement will be the same as everyone else's, thereby improving your personal "accuracy" rating.
- Once a School Table passes the Principles of Bijou we disqualify it from judging, until we salvage the table and rebuild it so that somebody else can get interested in Gem Cutting.
The next cut is Amanti_11.
Amanti_11
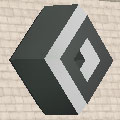
 | D = Sand Edge is the only sanding disc that's needed for the Amanti. We could start with a 3x3x3 cube and then sand off the top and bottom edges, because the finished Amanti cut is just a 3x1x3 square with an extra vertex in the center of two opposite faces, for a total weight of 3x3 + 2 = 11 carats. Although that approach seems obvious, it would lock us into a single location for the extra vertexes, and would prevent us from ducking an unexpected flaw. We're going to use a far more general approach that's a bit harder to visualize, but when you cut a Sprocket in a few minutes the pattern will become obvious. You can think of an Amanti_11 as a pair of four-sided pyramids, placed base to base. |
- Look at all the faces, and pick a face that has a nice unflawed section near the center of the face.
- Use D = Sand Edge and I = Pitch Clockwise to trim out the unflawed section that you selected. You're creating a rectangle with an unflawed near surface, with at least a little bit of unflawed sloped material on each edge.
- Here's the important concept: We're eventually after a pyramid that lines up with the OTHER side of the gem, which we haven't look at yet so we don't know where the flaws are going to be located. But we DO know that the pyramid on OUR side can be located anywhere in the mound that we just created.
- Use L = Roll Clockwise to place the mound we that just created on the bottom.
- Use D = Sand Edge to trim NEARLY to the bottom, but leave the one layer that includes the slope that you just created.
- Use J = Yaw Clockwise and D =Sand Edge to trim out each of the edges.
- Now we're to the easy part. Use J and D to create a point that has a little bit of unflawed material on ALL FOUR sides of the pyramid.
- Use L = Roll Clockwise to place the point that we just created on the bottom.
- Use J and D to trim off any excess material and create a matching top pyramid.
- Take a very close look at the characteristic teardrop edge that's created when two 60 degree Edge Sander planes intersect. You'll be seeing these teardrops again, and they are a MAJOR clue about how a gem was cut.
- Use I = Pitch Clockwise to orient the Amanti for the catalog.
Lens_12
 | The Lens is an "Oh Well" cut that you can use when you end up with a 4x1x4 flat surface, perhaps with no corners. |
- Use F = Sand Corner to trim off the corner
- Use S = Sand Face to square off the opposite side
- Use U = Pitch Anticlockwise then use F and S to create an octagon
- Use K = Yaw Anticlockwise then use S to sand off all but the final layer
- The finished cut is a 4x1x4 square minus the 4 corners, for a total weight of 12 carats.
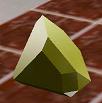
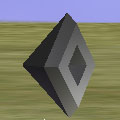
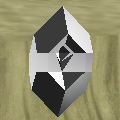
Thistle_12
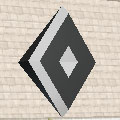
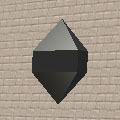 | The Thistle is a diamond shaped cut; Diamond shaped, not square. DO NOT use the S = Sand Face. You only need D = Sand Edge and F = Sand Corner. |
- Rotate the gem to get the worst looking edge Top Front Center.
- Use D = Sand Edge to get a nice wide flat surface.
- Use L = Roll Clockwise and then D to create a horizontal "cylinder" just a bit thicker than what we had for the corner heart.
- Use F = Sand Corner and L = Roll Clockwise to trim down to a nice point on the right end.
- Use K = Yaw Anticlockwise TWICE to flip the gem.
- Use F and L to create a point that still leaves a flat band in the middle.
- Use U = Pitch Anticlockwise to get the gem to the catalog position.
- The finished cut has a 2x2x2 diagonal core, with 2 additional vertexes on each end, for a total weight of 12 carats.
The next cut is Sprocket_14.
Sprocket_14
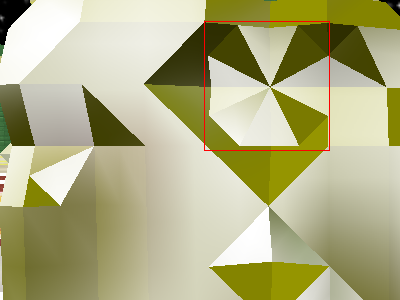
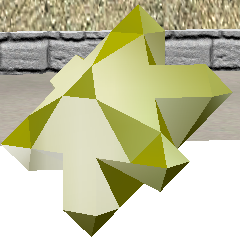 | The Sprocket is closely related to the Amanti, and can also be cut using just D = Sand Edge. The Sprocket is tricky to visualize, but it's just a pair of THREE sided pyramids placed base to base, on a slant. All of the fancy stuff along the edge is automatic, and you don't have to worry about it. To get three sides, rather than four, we'll be doing some fancy rotations. With the Amanti cut, when we were cutting on a flat plane, we got four 90 degree angles. This time you'll see a very small triangle surrounded by THREE (not four) teardrops in a sunburst pattern. Because we're sanding on a diagonal surface, we're actually making 120 degree angle cuts. |
- Pick the worst looking edge, and use the D = Edge Sander to get rid of it. You can eliminate as much as a third of the gem, but stop when you have a 2x2x2 triangular flat spot on the lower left side, with no adjacent deep flaw.
- Use J = Yaw Clockwise to get your recently created slope on the left side.
- Use D = Edge Sander and create a teardrop ridge that runs right along the edge of the triangle you found in the previous step.
- Now we're going to do a fancy rotation, to present the third face that we haven't worked on yet.
- Use K = Yaw Anticlockwise to bring the teardrop ridge around to the right side.
- Use U = Pitch Anticlockwise to bring the bottom corner of the ridge up to the top right corner.
- Use D = Edge Sander and create a point that's nicely in the middle of the previous ridge. You're looking for a sunburst pattern, with THREE teardrop ridges.
- If you think back to the Amanti Cut, we've just accomplished the first rectangle step, except that our surface isn't flat. Now we'll flip the gem and create the other pyramid and THEN we'll come back and shift this pyramid if we need to, to duck any flaws that we find on the backside.
- Yeah, it's tricky. Just hang on to the concept that you're creating a pair of base to base THREE sided pyramids, and ignore the fancy automatic stuff where the bases of the pyramids join.
- Use L = Roll Clockwise TWICE to flip the gem.
- Use D and J and D again and then the fancy K U rotation and finally D again.
- If you're lucky, you'll be able to trim all the way down to a single diagonal layer in the middle, with ONE vertex aligned on each opposite face. If you're lucky.
- If you weren't lucky, and a flaw forced you to offset the pyramids, use L = Roll Clockwise TWICE to flip the gem, and get it lined up so that you can trim the original pyramid.
- Don't pay attention to all the fancy stuff along the base of the pyramids. The Sprocket is really just a single layer diagonal slab with a extra vertex in the center of each face.
- The catalog is really picky about getting the orientation right.
The next cut is Symmetry_19.
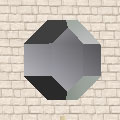
Symmetry_19
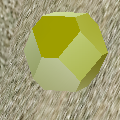 | The Symmetry is a 3x3x3 cube with no corners, for a total weight of 19 carats. |
- Rotate the gem and use S to square off the cube, perhaps with a few missing corners.
- Rotate the gem and use F to remove any remaining corners.
The next cut is Looking_Glass_24.
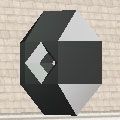
Looking_Glass_24
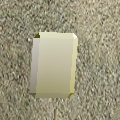 | The Looking Glass is a 4x6x1 plane, for a total weight of 24 carats. |
- Use just the S = Sand Face.
Dalessi_25
 | The Dalissi is a 4x4x4 cube with a goodly chunk missing from the opposite top corners. |
- Use the S = Sand Face to get a 4x4x4 cube, perhaps with two chewed up opposite top corners.
- Use the F = Sand Corner on the worst of the corners. Cut the corner all the way down to the bottom corner, and then sand it two more times.
- Use K = Yaw Anticlockwise TWICE to flip the gem, and use F to bring the diagonal just down to the corner.
- More than half of the cube is actually missing, so a Dalissi is a relatively easy cut if you use some imagination.
The next cut is Hiles_Chevron_25.
Hile's_Chevrons_25
| | Hile's Chevrons is a new cut that was released in December of 2006. It's similar to one side of an Amanti or Sprocket cut, but it uses the F = Edge Sander. The cut will fit in any 3x3x4 diagonal solid even if the edges on one of the 3x4 faces are badly chewed up. |
- Find or use S = Sand Face to create a flawless diagonal surface with at least 3x4 vertexes.
- Use F = Sand Corner and I = Pitch Clockwise to sketch out a rectangular 3x4 trim line. The corners will be beveled.
- If you're getting a beveled square, rather than a beveled rectangle, use S = Sand Face to remove one additional layer.
- Use L = Roll Clockwise to position the clean face on the bottom.
- Use F = Sand Corner and J = Yaw Clockwise to remove any excess material down to the trim line.
- Use U = Pitch Anticlockwise then O = Roll Anticlockwise to position Hile's Chevrons as required for the gem catalog.
The next cut is Choronzon_43.
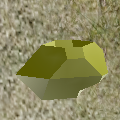
Choronzon_43
 | The Choronzon is a huge gem cut. It's going to be tough to find enough unflawed material to support the gem, and then you'll still have to do some pretty fancy sanding. It's easier to think about what you would LIKE to have, and then fit it into what you actually have. |
- You'd LIKE to have a perfect 7x7x7 diamond, with a point in the middle of each face of the gem, but the points can be missing because you're going to sand them off anyway and the finished cut will fit into a 5x3x5 solid.
- Rotate the gem and use F = Sand Corner to come as close as you can to a perfect diamond.
- Use S = Sand Face to knock off one point.
- Use K TWICE to flip the gem, and S again to knock off the opposite point.
- Use K once to rotate the gem. You'll be looking at the one of the 1x1 squares that you just created.
- Use S = Sand Face TWICE to knock two layers off of the point.
- Use K TWICE to flip the gem, and S TWICE to knock two layers off of the opposite point.
- Use K once to rotate the gem. You'll be looking at one of the 3x3 diamond faces that you just created.
- Use D = Sand Edge to knock off the top of the diamond.
- Use L = Roll Clockwise and D = Sand Edge to knock off three more edges.
- Use U = Pitch Anticlockwise to get the gem into the catalog position.
The next cut is a Flawed cut, the Hexas_Plate_F9.
Flawed Cuts
All of the previous gem cuts have been convex. You could have started out with a perfect 7x7x7 cube and all of the cuts so far would have been possible. The free ride is now over. For the remainder of the cuts, you must first find, and then preserve, a flaw.The brutal reality is that the convex cuts, the ones that we've done so far, are all secondary cuts. If you can't find a useful flaw configuration, you can fall back to a cut that doesn't require any flaws.
All flaws are straight into a face of the gem for a random number of vertexes. All flaws are, therefore, fully visible from the outside of the gem if you can get the angles right. Some players like to stand with their head in the gem and use a tight F5 view so that they can see the internal structure of the gem.
Hexas_Plate_F9
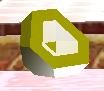 | The Hexas Plate is easy to find and fairly easy to cut. Find a two vertex flaw that's near a corner, to preserve as much of the gem as possible. That way you can try a different flaw if the first one doesn't work out. |
- Rotate the gem so that the flaw is in the upper right corner of the face you are looking at.
- Use the F = Sand Corner to cut the top out of the flaw.
- If you don't have a solid bowl with a little triangle at the bottom (remember the Corner_Heart?), switch to a different flaw.
- Use S = Sand Face to chop off most of the extra gem material.
- Flip the bowl and use F to trim the excess material off of the back of the bowl.
The next cut is Bastet_F11.
Bastet_F11
 | The Bastet is easy to find and easy to cut. You only need a two-vertex deep flaw with some material behind it. The Bastet is a secondary cut that's handy when the eyelet you're working on turns out to missing some pieces. |
- Use S = Sand Face to knock out opposite faces of the flaw. You want a plane one layer thick with a notch in the front edge.
- Use U = Pitch Anticlockwise and then use S to trim off all but the side of the flaw, flip the gem, and trim the the other side.
- Use U to set the gem on edge, then J = Yaw Clockwise to get the ears on the left side.
- Use S = Sand Side to square off the ears if they are uneven.
- Use F = Sand Corner to trim out one side of the chin, the flip it and trim the other side.
- Rotate the gem to get the ears on top, in the position required by the gem catalog.
The next cut is Ring_F13.
Ring_F13
There are several cuts that use a diagonal border that's parallel to the sides of a flaw, including Ring, Queen's Tomb, King's Tomb, Aidenn Mask, Dragyn's Eye, Cat's Eye, and Unity. To avoid blind cuts, it's very convenient to sketch out the area that you wish to preserve on the visible face, retaining as much border, and thereby flexibility, as possible. The border might be 0, 1, or 2 vertexes wide, but it always needs to be symmetrical.
- Use F = Sand Corner to create a border parallel to the diagonal boundary of the flaw.
- Use I = Pitch Clockwise to expose each side of the gem, and F = Sand Edge to sketch out the border.
- Now that you have defined the edges on the front face you can lay that face on the bottom of the gem, and use the trim lines so you're not making blind cuts.
 | A Ring isn't required for the Test of Marriage, but it's certainly an expected part of most ceremonies. A Ring isn't exactly easy to find, as it requires two intersecting flaws in the same plane, but it's a handy escape cut when an intersecting flaw messes up other more restrictive cuts. |
- Find a one-vertex flaw near an edge, with at least one vertex of unflawed gem on opposite corners, and consequently a partial border. This configuration often pops up when you've been using the S = Sand Face to flatten out the jagged face of a deep flaw, while praying that the flaw is three or four vertexes deep.
- Use U = Pitch Anticlockwise to get the flaw over to the left side of the gem face with the unflawed material above and below the flaw, then use K = Yaw Anticlockwise to see if you have an intersecting flaw in the same plane at right edge of the adjacent face.
- If you don't have a full boundary and you also don't have an intersecting flaw, then the single vertex flaw is useless. If there is an intersecting flaw, you have a Ring in the making.
- Use J = Yaw Clockwise and then S = Sand Face to remove the excess material to the left of your flaw.
- Use U = Pitch Anticlockwise TWICE to flip the gem, and trim the excess material from the other side.
- Use L = Roll Clockwise to position the gem face down, and use the F = Sand Corner until you reach the edge that you defined earlier.
- Use J = Yaw Clockwise to bring the other three faces under the F sander, and trim to the defined edge.
- Use U TWICE and then K if need be to get the Ring into the catalog position.
The next cut is Bridge_F14.
Bridge_F14
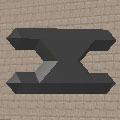 | The Bridge is trickier than it looks, because it's actually a side view of opposing flaws that are either 2+2+3 or 3+2+2 deep with two vertexes of unflawed material in the middle. The finished bridge is six vertexes long, so the unflawed vertex pair has to be near the centerline of the gem. If you see opposing groves when you are using the S = Sand Face, while using K and J so that you can see what you're doing, you can get a bridge out of that gem. The light can a little bit weird sometimes, which can make it hard to see into the deep flaws. It's sometimes handy to rotate the screen a little bit, rather than the gem, to see what the shadows are doing, and double-check to be certain that you've maximized the shadowing texture in your video options. |
- Use S = Sand Face to expose the grooves.
- Use K = Yaw Anticlockwise to expose the backside of the grooved face to the S = Sand Face, and sand off all but the final layer.
- Use J = Yaw Clockwise to bring the notches back around to the visible face.
- Use D = Sand Edge and I = Pitch Clockwise to trim off the excess material and then get the Bridge into the catalog position.
The next cut is Reflection_F14.
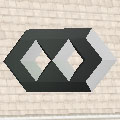
Reflection_F14
 | The Reflection may look like a solid cut, but you can't get the indents without having some flaws in the right position. You need a couple of two vertex flaws that are touching corner to corner, but one of them can be a groove on the face of the gem. There's an important philosophical concept here. It's very important to keep your options open as long as you can. You always want to try for the rarer cuts, but you have to settle for what you can get. In this case, Tombs and Unity are unlikely, because one corner of the border is missing, but a Full Eye or an Eyelet is still a definite possibility. If we discover a flaw on the backside of the face, we can resort to an Aidenn Mask if we have an unflawed vertex outboard of each flaw. But we need to keep all of these options open. |
- Use K = Yaw Anticlockwise to expose the backside of the face to the S = Sand Face, and trim away all but THREE layers.
- Peek if you want to, but then use J = Yaw Clockwise. If you can see through either hole, you might have a Full Eye!
- Use U = Pitch Anticlockwise if you need to, so that the holes are stacked vertically.
- Use S = Sand Face to trim one long side, then I TWICE and trim the other long side.
- Use I = Pitch Clockwise to lay the cylinder on it's side.
- Use L = Roll Clockwise and carefully study what is going on with any flaws in the cylinder.
- If you don't have a three vertex flaw with three clean boundries on both ends, give up on the Full Eye and use S to trim one more layer, leaving the two layers that you need for your other possible cuts.
- If you don't have a two vertex flaw with three clean boudaries on both ends, give up on the Eyelet.
- If both ends have an unflawed border, then you can use S to trim one more layer for an Aidenn Mask.
- If both ends are chewed up, use U to get the holes side by side and then use S to trim the outer corner of each hole, leaving the opposing notches that you need for Reflection.
The next cut is Aidenn_Mask_F15.
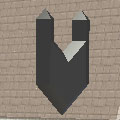
Aidenn_Mask_F15
 | You can cut an Aidenn Mask if you have point to point adjacent shallow flaws, or deeper flaws, so long as there is a border of unflawed gem on both ends. |
- Use I = Pitch Clockwise to rotate the eyeglasses on the front face of the gem.
- Use S = Sand Face to trim out the unwanted bulk of the gem on both long sides.
- Use F = Sand Corner to sharpen up the pointed ends, but be sure to leave the one vertex border that you need.
- Use K = Yaw Anticlockwise and S = Sand Side to trim off all but the rightmost layer of the gem.
- Use J and I to present the cut in the catalog position.
The next cut is Eyelet_F16.
Eyelet_F16
 | An Eyelet is one of the obvious cuts. It's just a 3x2x3 box with a hole through it, right? The catch is that you can destroy an awfully lot of rare cuts if you jump right to an Eyelet. Conversely, if you need Eyelets, and every Venery Lockbox needs a set of Eyelets, you can get an Eyelet about 80% of the time if you can see a hole with an unflawed vertex adjacent to each side. |
We want to retain as MANY options as possible when there's an isolated deep flaw in the face of a gem.
- If the flaw is exactly in the middle of the face, we might be able to cut a King's Tomb.
- If the flaw is near the center of the face and there's no visible pattern at the bottom of the hole, we might be able to cut a Cat's Eye, or Unity.
- If the flaw is near the center of the face and there IS a visible pattern at the bottom of the hole, we might be able to cut a Queen's Tomb.
- If the flaw is on the outside edge and we can see a pattern at the bottom of the hole, then hope for an Eyelet.
Let's uncover what we have.
- If there's a full clean border, even if it's not in the outermost layer of the gem, LEAVE IT IN PLACE!
- Then use F = Sand Corner and I = Pitch Clockwise to sketch out the diagonal border.
- Else use D = Sand Edge and I = Pitch Clockwise and trim right to the corners of the flaw, WITHOUT destroying stuff you haven't looked at yet.
- Use L = Roll Clockwise to position the gem face down.
- Use F = Sand Corner or else D = Sand Edge to get rid of the junk that can't possibly be part of the final cut.
Now take a look at the exposed pyramidal surfaces.
- If they're clean, use I = Pitch Clockwise and use S = Sand Face to see if you can come up with a Tomb by making the base flaw shallower.
- If the exposed surfaces are chewed up, use U = Pitch Anticlockwise and then use S = Sand Face to trim off the point until the remaining gem is only three layers deep, and then use K = Yaw Anticlockwise to see what you have.
- If you can see a hole, you have at least a Full Eye, and maybe even a Cat's Eye or a Unity.
- If you can't see a hole, then it's only an Eyelet. Use K TWICE to flip the gem back around to the flawed face, use U and S to square it off, and then K and S again to finish the Eyelet.
The next cut is Dragyn's_Eye_F17.
Dragyn's Eye_F17
 | The Dragyn's Eye cut will drive you crazy. Looking for intersecting deep flaws is bad enough, but it's the three unflawed corner points and the unflawed bottom that will have you talking to yourself. If one of the flaws has at least a partial border, then you can probably get a Ring cut as a consolation prize, otherwise you can try for a Lotus. The correct flaw configuration for a Dragyn's Eye is very rare, and then you get to make a blind cut. The conceptual starting point for a Dragyn's Eye is a 4x4x4 cube with two (but not three) intersecting flaws jammed into one corner. You need to rotate the cube so that the flaws are the Back Left Bottom corner of the cube, and then you use the F = Sand Corner to cut away 50% of the cube. It's that simple, and that hard. |
The next cut is Queen's_Tomb_F18.
Queen's_Tomb_F18
 | Queen's Tomb is one of the fun cuts. It's fairly easy to find, and not too hard to cut. It's a 5x5x5 pyramid with a shallow flaw in one face that represents the tomb chamber. |
- Look for a shallow flaw surrounded by an unflawed border.
- Use F = Sand Corner and I = Pitch Clockwise to trim down to a 5x5 diamond with the flaw in the middle.
- Use L = Roll Clockwise to position the flaw on the bottom face.
- Use F and I to create a point that's exactly above flaw, trimmed to the edge of the bottom face.
- Use U = Pitch Anticlockwise to position the cut as indicated in the Gem Catalog.
The next cut is Thoth's_Knot_F18.
Thoth's_Knot_F18
 | Thoth's Knot is a new cut that was released in December of 2006. The cut requires two nearly intersecting deep flaws, where "nearly" means that the top half of one flaw intersects at right angles with the bottom half of the other flaw. The finished gem would fit in a 3x4x3 solid with holes entirely through the gem in both short directions, semi-stacked. The finished cut is a quadrahedron, similar to the Corner Heart only much larger, and the "knuckles" are created by removing the least adjacent nodes of the two tubes. You saw a similar configuration when you cut the Ring. It's useful to think of the Thoth's Knot as composed of two Rings, jammed together face to face, with one Ring twisted 90 degrees. |
- Once you've found the proper 3 vertex tubes that cross at right angles, offset by one vertex, start worrying
- Rotate the gem so that the tubes are stacked on top of each other.
- Use S = Sand Edge to square out a 3x3xN column
- If BOTH holes are deep enough to go clear through the gem, count your blessings. It won't happen very often.
- Use J = Yaw Clockwise until you are looking though the top hole
- Use D = Sand Edge until you have trimmed down to the top corner of the hole
- Grit your teeth, and use D = Sand Edge one more time to take out the top front corner of the hole
- Use J = Yaw Clockwise and do the same on the other end of the hole
- Use L or U TWICE to flip the gem, then J = Yaw Clockwise to line up the other hole
- Use D = Sand Edge to remove the top corners on the second hole
- Rotate the gem, if you need to, to match the gem catalog
The next cut is Lotus_F19.
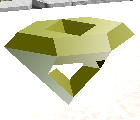
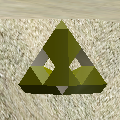
Lotus_F19
 | Keep half an eye open for a surface that looks like a pizza with 12 slices. Alternatively, if you have intersecting deep eyes that won't support a Dragyn's Eye or a Ring, you can sand the top off of the intersecting deep flaws to expose the bottom of the crossover and guess what? It looks exactly like a pizza with 12 slices. |
- Use S = Sand Face to trim away all but the 3x3 area that contains the pizza.
- Use L = Roll Clockwise so that the pizza is face down. If any of the points are missing it's not a Lotus. Try for a Thistle cut.
- Use F and K to create a point exactly above the Lotus, with a one unit band of unflawed gem.
- Use L = Roll Clockwise to position the Lotus as required for the Gem Catalog.
The next cut is Appolonia_F21.
Appolonia_F21
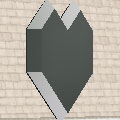 | The Appolonia is a large Valentine's cut. It's only one layer thick, but it's 5 vertexes wide and 6 vertexes tall. |
- Find a notch or a flaw next to an edge, with a 5x1x6 area that flawless except for some corners.
- Use F = Sand Corner to trim out the slanted sections.
- Use D = Sand Edge to trim off the top if you started with a flaw rather than a notch.
- Use I = Pitch Clockwise to trim out the heart shape.
- Use K = Yaw Anticlockwise and then S = Sand Face to remove all but the rightmost layer of the gem.
The next cut is Full_Aidenn_Mask_F21.
Full_Aidenn_Mask_F21
 | The Full Aidenn Mask is the large version of the Aidenn Mask, it was released for Test of the Megalopolis. It is a rare cut, that is easy to cut. It is made up of two eyelets, side by side, with a flaw tucked in between them at the bottom. |
- Use S = Sand Face to get rid of the gems that is not part of the two eyelets.
- Use D = Sand Edge to trim off the two bottom ends, beside the in between flaw.
The next cut is Khufu's_Ship_F22.
Khufu's_Ship_F22
 | The Khufu's Ship is a fun gem that's easy to find, but tricky to cut. |
- Look for a bathtub shaped flaw that's one vertex deep and two vertexes long.
- Use I = Pitch Clockwise, if needed, so that the bathtub is sitting on end.
- Use F = Sand Corner to trim down to the slanted edge of the flaw.
- Use S = Sand Face to trim over to the long side of the flaw.
- Use I and F to trim the other side of the slant.
- Use I to set the bathtub on end again, and trim out the other three edges.
- Make sure the bathtub is horizontal, and then use L = Roll Clockwise to get the bathtub on the bottom.
- Use D = Sand Edge to get down to the trim line, and create the keel of the boat.
- Use F = Sand Corner to start the pointy end of the boat.
- Use J = Yaw Clockwise and then F to finish the pointy end of the boat.
- Use J again and then D to finish the other side of the keel.
- Use J again and then D to create the stern of the boat.
- WARNING: THIS IS A TRICKY CUT. Don't cut the end out of the bathtub.
- Use J again and then O TWICE to orient the boat so that it will float into the Gem Catalog.
The next cut is Full_Eye_F24.
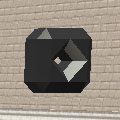
Full_Eye_F24
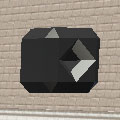 | We've already beat this one to death. It's just a 3x3x3 cube with a hole through it. |
The next cut is Ra's_Lantern_F27.
Ra's_Lantern_F27
 | Ra's Lantern is a new cut that was released in December of 2006. Ra's Lantern is a cruel cut. The cut itself is not very hard, but it's nearly impossible to find the bathtub flaw that you will need. Not just any old bathtub either, but a bathtub with a slanted bottom. You'll get very, very tired of seeing bathtubs with a 3 vertex drain where you need a 2 vertex slant. The cut will fit in a 3x3x5 solid with a rare flaw combination in one vertical face. |
- Find a slanted bathtub flaw, adjacent 1 vertex and 2 vertex flaws. There must be unflaw material behind the flaws, and unflawed material in the center of the top and bottom face. This is a very tough combination to find.
- Use S = Sand Face to trim away excess material, leaving only a 3x3xN column
- If the deeper hole penetrates the back surface, hopefully you need some more Eyelets, because you don't have a Ra's Lantern. You'll get LOTS of eyelets.
- Use F = Sand Corner (NOT D) and trim right down to the edge of the bathtub
- Use J = Yaw Clockwise and F = Sand Corner to create a centered pyramid. This isn't nearly as easy as it sounds, but you can always use the Eyelets.
- Use L = Roll Clockwise TWICE to flip the gem, and use F and J to create a pyramid on the other end
- Rotate the gem to get the deeper flaw on top, facing north, as required for the gem catalog
The next cut is Cat's_Eye_F28.
Cat's_Eye_F28
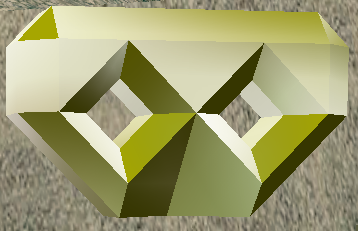
 | If you have a nearly centered flaw with no deep adjacent flaws, you can hope for a Cat's Eye. The Cat's Eye is a Full Eye with a tutu around it's middle. The Cat's Eye will fit in a 5x3x5 cube. |
- Find a nearly centered flaw that's three vertexes deep. If it's surrounded by shallow flaws, that's OK.
- Use D = Sand Edge and I = Pitch Clockwise, to trim down to each POINT (not the diagonal edge) of the flaw.
- Use K = Yaw Anticlockwise and then S = Sand Face to trim away all but the right three layers.
- Use K = Yaw Anticlockwise again, and then D and I some more to trim down to each POINT of the flaw.
- Use K = Yaw Anticlockwise to position the cut as required for the Gem Catalog.
The next cut is Tiki_Mask_F35.
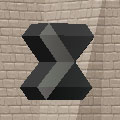
Tiki_Mask_F35
 | The Tiki Mask is a pair of full eyes, one vertex apart on the centerline of the gem, with a flaw between the full eyes one vertex below the full eyes, this flaw is needed for the "nose/mouth". We have yet to cut a Tiki_Mask. Meanwhile we've left this table so that anybody can change the sample gem, and help us hunt for the right flaw configuration. If you do manage to cut a Tiki Mask, please set it as the Challenge Cut, and /Chat McArine. We'll come a running to lock the cut in place. The instructions below are not complete, and should be considered rough guidelines. |
- Use S = Sand Face to uncover the backside of the Tiki Mask.
- Put the Tiki Mask on its back.
- Use D = Sand Edge to make the ridge of the nose.
- Raise the Tiki Mask, and turn its side to the Sand Edge.
- Use D = Sand Edge to make the pointy "hat".
- Twist the Tiki Mask so you have the face in front of you.
- Use F = Sand Corner to cut the front of the "hat".
- Put the Tiki Mask upside down, and back to the front.
- Use F = Sand Corner to make the "jaw". Be carefull with this, as you risk cutting off to much of the "jaw".
- Twist the Tiki Mask to face front, still upside down.
- If there is a "goatee" remove this using D = Sand Edge.
- Turn right side up, and you should be finished.
The next cut is Unity_F36.
Unity_F36
 | If you have a flaw that is three vertexes deep, with four single vertex borders of unflawed gem material, including the corners, you may well have a Unity. |
- Use the F = Sand Corner and I = Pitch Clockwise to trim down to a one vertex border. We're starting off exactly as we would for a Queen's Tomb, except that the hole is much deeper.
- Use K = Yaw Anticlockwise and use S = Sand Face to trim away all but the right three layers of the gem.
- Go ahead, use J then K to sneak a peek at the hole if you wish.
- Use D = Sand Edge and L = Roll Clockwise to trim down to the border that we established earlier.
- Presto! A Unity cut.
The final cut is King's_Tomb_F43.
King's_Tomb_F43
 | The King's Tomb is cut just like a Queen's Tomb, except that the flaw has to be in the exact center of the face, so that the unflawed border can be two units wide. Need we say more? |
While the venery is still active, please test your new skills on the Test of the Bijou tables at the front of the compound. You won't get (and don't need) any keys from the contest tables, but there are some artful hints in case you get stuck.
The next stop is Venery_Judging. When you're all done, please return to the starting point and click on "Search for a Key" to complete the Venery. You'll get a certificate, but you must click again to record your judgement.
Price_List
For trading contact McArine.Our retail (risk free) prices are approximately twice as expensive as our best effort (your risk) prices.
The price list only contains prices for gems that have a current use (except Megalopolis cuts, and Ring)
Please notice that at this point we do not have cutters that are willing to cut for a Megalopolis.
Please notice that we do not accept CC as payment anymore. But we do take all other kinds of goods. Have a look at EldradUlthran's page for some comparative pricing.
Charcoal per Cut Gem, in Catalog sequence (Subject to availability).
- _400 per Eyelet, 600 per Amethyst or Turquoise for Lockboxes
- 1400 per set of Eyelets for Empty Hand(our choice of gem).
- _300 per Thistle
- _200 per Lens
- _800 per Choronzon
- _800 per Queen's Tomb, 1000 per Amethyst or Turquoise for Bijou Tables
- 3000 per Full Eye, 5,000 per Turquoise for Flax Gins
- _800 per Dalessi
- _400 per Amanti
- _300 per Bastet
- _600 per Appolonia
- _400 per Hexas Plate
- 1500 per Ring
- 4000 per Dragyn's Eye
- _400 per Looking Glass
- _400 per Symmetry
- 1200 per Khufu's Ship
- _900 per Hile's Chevron's
- 2500 per Ra's Lantern
- We don't purchase cut gems for our own inventory, nor do we sell charcoal.
- We don't purchase or sell uncut gems outright but we'll go either way as part of a cut gem sale.
- If you want to pay with cuttable gems, we value Amethyst and Turquoise = 200 CC, Garnet, Lapis and Sunstone = 125 CC, Jade = 100 CC and Citrine = 75 CC.
Your best approach is to learn how to cut the gem yourself, and that's really why we built the Bijou School; but if you're good at charcoal, even though you suck at gem cutting, there's still hope.
Our retail prices are determined by how hard it is to find the required gem flaws, and by the demand for that particular cut gem. The more inventory we have for a particular cut gem, the cheaper it's likely to be. Cuttable equivalent to CC prices are determined by our current stock of gems.
- There is no charge for cuttable gems that you get from the Watermine.
- Our retail prices indicate how likely we are to find the particular flaws needed for a specified cut, but luck is a HUGE part of gem cutting.
- Your best quarantee is to try the cut yourself, first, on the Bijou table. That will make the whole experience far more interesting for everybody, as you'll better understand why gem cutting is so fascinating.
- The for-hire cutting price is 50 charcoal PER LOAD plus 75-200 charcoal PER CUTTABLE GEM. The best effort cut gem is yours, there's something nearly every time, and we might even accept it in lieu of part of the fee, at 50% of the retail price, if we need that cut gem in our inventory.
- You'll never pay more than the retail price for our best effort cutting, if we have the cut gem in stock, and you'll pay 50% of retail, on average, if you hang around and provide the entertaimment.
This is an optional key that is not needed to complete the Venery.
Gem_Catalog
Please use one of the public tables in the back right corner of the compound for cutting actual gems.We're trying to keep this table public, with a gem loaded, so that everyone has access to the Gem Catalog. Please help us keep a cuttable gem on this table at all times.
The front row has tables for the Test of the Bijou. The remaining rows are Student Tables, sequenced to match the catalog.
The actual venery proceeds from Easy > Hard. The sort order is first Unflawed > Flawed, then Low Carat > High Carat.
This is an optional key that is not needed to complete the Venery.
Revision Log
- 2008L01: Added Full Aidenn Mask, adjusted the price list, edited description of Tiki Mask, and some text to explain the current setup of FAM, TK and CH.
- 2006L31: Added the Price_List and Gem_Table Lockboxes
- 2006L30: Finished all of the School Table Lockboxes, and added a price list.
- 2006L25: Released the Venery for competition.
- 2006L24: Changed the clocks to being on the left, near, and top faces of the gem. Added another dozen lockboxes, and released the Venery for judging
- 2006L20: Added the preferred video settings, especially maximizing shadows to get gradients
- 2006L11: Flipped J and K.
- 2006L08: Added the writeup for three new cuts.